Module 56 - T351
T351: Center-to-Center (C2C) Reference Implementation (RI): Applying the C2C Reference Implementation
HTML of the PowerPoint Presentation
(Note: This document has been converted from a PowerPoint presentation to 508-compliant HTML. The formatting has been adjusted for 508 compliance, but all the original text content is included, plus additional text descriptions for the images, photos and/or diagrams have been provided below.)
Slide 1:
(Extended Text Description: Welcome - Graphic image of introductory slide. A large dark blue rectangle with a wide, light grid pattern at the top half and bands of dark and lighter blue bands below. There is a white square ITS logo box with words "Standards ITS Training - Transit" in green and blue on the middle left side. The word "Welcome" in white is to the right of the logo. Under the logo box is the logo for the U.S. Department of Transportation, Office of the Assistant Secretary for Research and Technology.)
Slide 2:
(Extended Text Description: This slide, entitled "Welcome" has a photo of Ken Leonard, Director, ITS Joint Program Office, on the left hand side, with his email address, Ken.Leonard@dot.gov. A screen capture snapshot of the home webpage is found on the right hand side - for illustration only - from August 2014. Below this image is a link to the current website: www.its.dot.gov/pcb - this screen capture snapshot shows an example from the Office of the Assistant Secretary for Research and Development - Intelligent Transportation Systems Joint Program Office - ITS Professional Capacity Building Program/Advanced ITS Education. Below the main site banner, it shows the main navigation menu with the following items: About, ITS Training, Knowledge Exchange, Technology Transfer, ITS in Academics, and Media Library. Below the main navigation menu, the page shows various content of the website, including a graphic image of professionals seated in a room during a training program. A text overlay has the text Welcome to ITS Professional Capacity Building. Additional content on the page includes a box entitled What's New and a section labeled Free Training. Again, this image serves for illustration only. The current website link is: https://www.its.dot.gov/pcb.)
Slide 3:
T351
Center-to-Center (C2C) Reference Implementation (RI): Applying the C2C Reference Implementation
(Extended Text Description: Title slide: This slide displays the title of the course, "Center-to-Center (C2C) Reference Implementation (RI) Apply C2C Reference Implementation" with the logo of the C2C RI version 2 software underneath.)
Slide 4:
Instructor

Kenneth Vaughn, P.E.
President
Trevilon LLC
Magnolia, TX, USA
Slide 5:
Learning Objectives
- Install and configure the C2C RI on a PC
- Operate the C2C RI
- Retrieve the C2C RI results from a test
- Prepare a report based on the C2C RI results
Slide 6:
Learning Objective 1
- Install and configure the Center-to-Center (C2C) Reference Implementation (RI) on a personal computer
Slide 7:
Obtaining the C2C RI
Obtain the latest version
Download at:
https://www.standards.its.dot.gov/DeploymentResources/Tools

Site is updated with the latest version User Manual is included
Technical support via e-mail at: c2crisupport@transcore.com

Slide 8:
Review Requirements
Requirements to Run C2C RI
- System requirements
- Interoperability requirements
- Skillset requirements for operator
Slide 9:
Review Requirements
Recommended Minimum System Requirements
Windows 7 or 8
- 64-bit Professional
2 GHz processor
4 GB RAM
1 GB Storage
1 Gbps Ethernet interface
Java SE Runtime Environment (JRE) V7.17
Slide 10:
Review Requirements
Interoperability Requirements
Interoperability is the main purpose of ITS Standards
The ability of two or more systems or components to exchange information and use the information that has been exchanged
-- IEEE 610.12
Slide 11:
Review Requirements
Interoperability Requirements
C2C interoperability testing relies upon:
- User needs (Module A321a)
- Requirements (Module A321b)
- Design (TMDD and NTCIP 2306 Standards)
- Verification (Module T321)
- Validation (Module T321)
- C2C RI (Module T251 and T351)
Passing C2C RI does not guarantee full interoperability
- Requires user interaction
- Not exhaustive
- Standards may have ambiguities
Slide 12:
Review Requirements
Required Skillset of Operator
See T251 for details
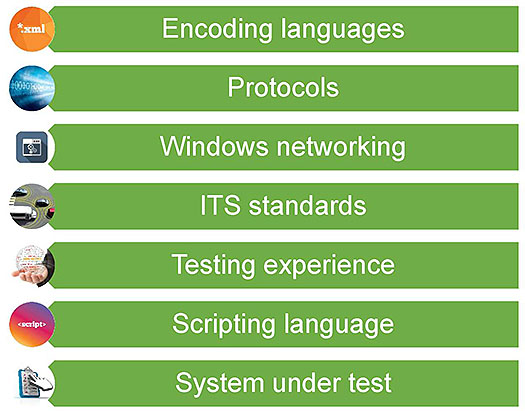
(Extended Text Description: Required skillset of the operator: This slide provides a list of skills that an operator needs to have to use the C2C RI with each item shown in a box with a green background and a related image on the left-hand side. The images and text for each item is as follows: 1. The text "*.xml" on an orange background for the item "Encoding languages" 2. An electronic-looking stream of zeros and ones for the item "Protocols" 3. A MS Windows "Settings" icon for the item "Windows networking" 4. Four connected vehicles driving through an intersection for the item "ITS Standards" 5. A hand holding a transparent ball with words on it, with the text "experience" highlighted for the item "Testing experience" 6. The text "<script>" on a reddish background for the item "Scripting language" 7. A clipboard with a sheet of paper with checkboxes and text with a hand hovering over it for the item "System under test" This slide includes the checklist icon in the lower right corner. The full bulleted list is shown below:
- Encoding languages
- Protocols
- Windows networking
- ITS standards
- Testing experience
- Scripting language
- System under test
)

Slide 13:
Basic Configuration
Understand C2C Environment
C2C RI tests Center-to-Center communications
One center is called the "owner"; the other is the "external"
Exchanges include discovery and data exchange

(Extended Text Description: Understand C2C Environment: This slide depicts a center-to-center exchange at the bottom of the slide. In the lower left, there is a picture of the TRANSCOM control room, which is labeled "Owner". In the lower right, there is a picture of the NYCDOT control room labeled "External". Between the two pictures are two, bi-directional, blue arrows. The upper arrow is labeled "Discover Services" and the lower arrow is labeled "Exchange Data".)
Slide 14:
Basic Configuration
Understand C2C Environment
For the purpose of testing, either end (or both) can be replaced by C2C RI
A real test would replace only one end of system
Presentation connects two C2C RIs to demonstrate each mode
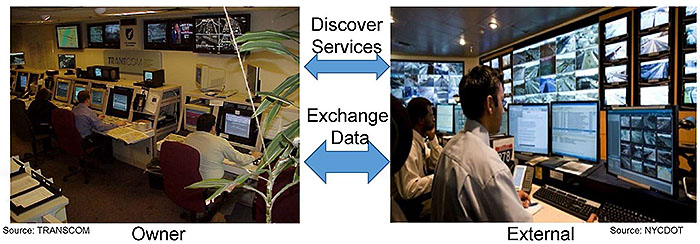
(Extended Text Description: Understand C2C Environment: This slide depicts the same center-to-center exchange environment as described on the previous slide. However, as the speaker talks, the owner center is then replaced with a laptop displaying the C2C RI logo showing that the software can take the place of an owner center and test an external center. As the speaker continues to talk, the owner center picture is restored and the external center picture is replaced by the image of a laptop running the C2C RI – demonstrating that the C2C RI can take the place of an external center and test an owner center. Finally, both centers are replaced an image of the laptop running the C2C RI – showing how we will connect the software for the purposes of this training course.)
Slide 15:

Slide 16:
Question
Which of the following statements is untrue?
Answer Choices
- C2C standards define how services can be discovered
- A C2C exchange occurs between an "Owner center" and an "External center"
- The C2C RI software is available for free
- ITS standards only define how to exchange information
Slide 17:
Review of Answers
 a) C2C standards define how services can be discovered
Incorrect. The WSDL file allows an External center to discover the services offered by an Owner center.
 b) A C2C exchange occurs between an "Owner center" and an "External center"
Incorrect. Exchanges occur between Owner and External centers.
 c) The C2C RI software is available for free
Incorrect. The C2C RI can be downloaded for free from https://www.standards.its.dot.gov/DeploymentResources/Tools.
 d) ITS standards only define how to exchange information
Correct! ITS standards also define how to use Information,
Slide 18:
Basic Configuration
Steps to Set Up the C2C RI
- Install the C2C RI
- Define initial configuration of C2C RI
- Configure the service announcement file
- Configure the C2C RI to reference the file
- Identify applicable test cases

Slide 19:
Basic Configuration
Installation and Initial C2C RI Configuration
- Install using the supplied Windows installer
- Start the C2C RI
- Configure default directories, etc.
Slide 20:
Basic Configuration
Initial C2C RI Configuration
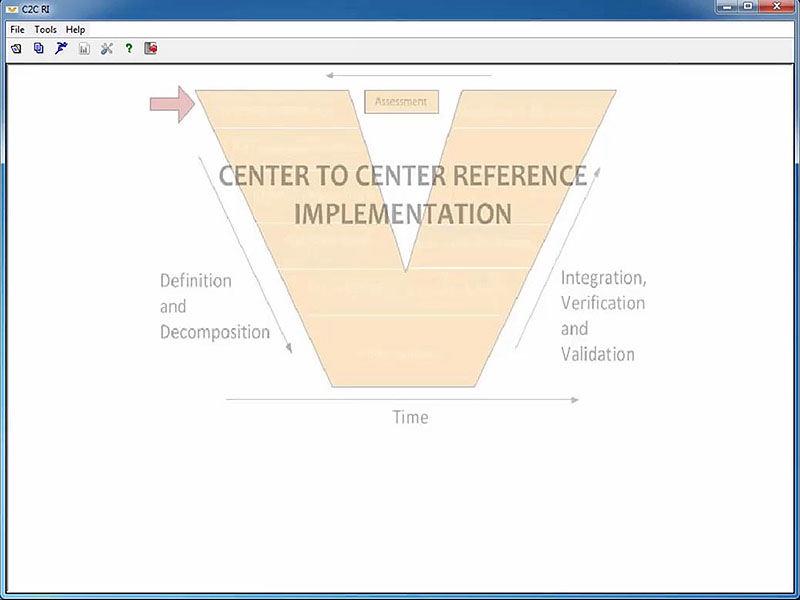
(Extended Text Description: Initial C2C RI Configuration - frame 1 of 10. Please note, this slide contains a short video clip. The author's relevant key message and transcript of the video clip, along with key still frames of the video clip are presented below.
Author's relevant narration of this frame: In this video we'll learn how to customize the default directories and some other parameters for the C2C RI.
Key message/narrative of overall video clip: Visually display how initial configuration is achieved. In this video we'll learn how to customize the default directories and some other parameters for the C2C RI. To customize these values, go to Tools/Options, which will bring up the dialog box for your options. On the "General" tab, you'll be able to configure your username as well as your organization name, and configure your default directories for various file types. Any invalid directories will appear in red; you can either replace them in straight text or by using the browser dialog. Also, go to the "Logging" tab and make sure that the directory location on that tab is also correctly set. The default values provided on the other tabs should already have appropriate values for normal testing. Once you're done, you can click on "Save" and then "Done.")
All directories must exist on the local machine; changing the values is especially important if the C2C RI is not installed in the default location.
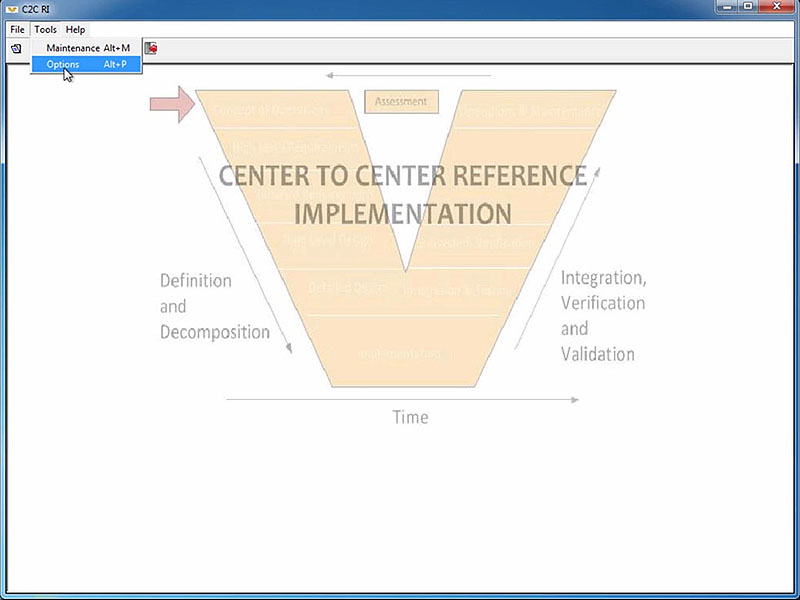
(Extended Text Description: Initial C2C RI Configuration - frame 2 of 10. Please see prior frames of this short video clip for more information. Author's relevant narration of this frame: To customize these values, go to Tools, Options, which will bring up the dialog box for your options...)
(Extended Text Description: Initial C2C RI Configuration - frame 3 of 10. Please see prior frames of this short video clip for more information. Author's relevant narration of this frame: ...and you'll be able to configure your username as well as your organization name, and configure all of your directory structures. Any invalid directories will appear in red. You can either replace them in straight text, or using the hand browser button.)

(Extended Text Description: Initial C2C RI Configuration - frame 4 of 10. Please see prior frames of this short video clip for more information. Author's relevant narration of this frame: Fields have been updated...)
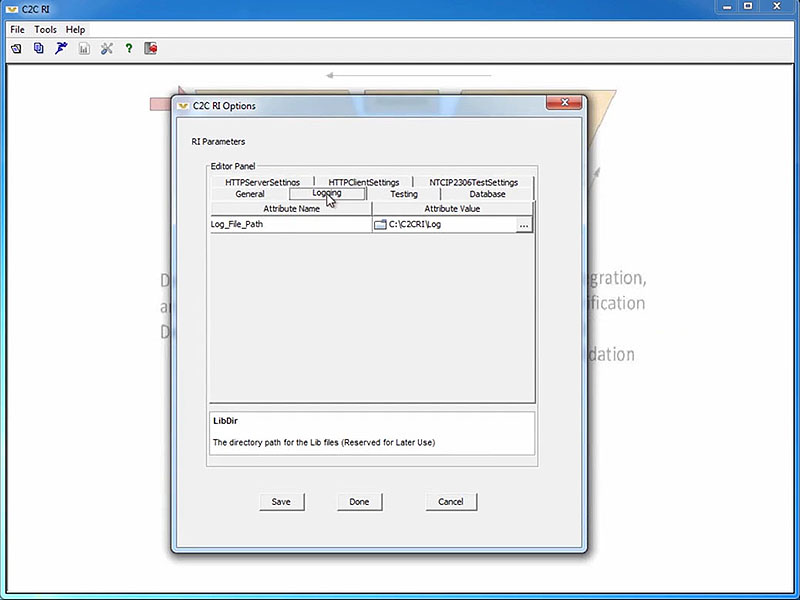
(Extended Text Description: Initial C2C RI Configuration - frame 5 of 10. Please see prior frames of this short video clip for more information. Author's relevant narration of this frame: Make sure you go to the Logging tab as well. There's another directory structure there.)
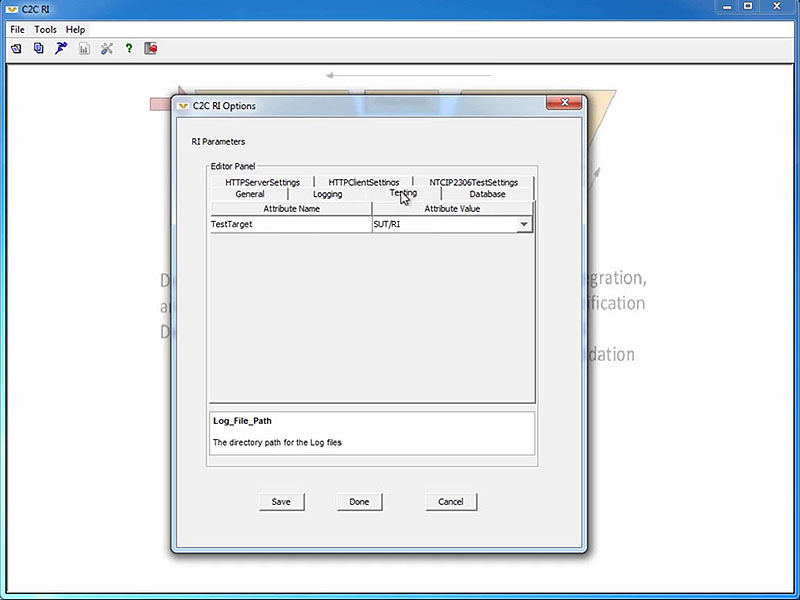
(Extended Text Description: Initial C2C RI Configuration - frame 6 of 10. Please see prior frames of this short video clip for more information. Author's relevant narration of this frame: The other values should default to the correct values for normal testing.)
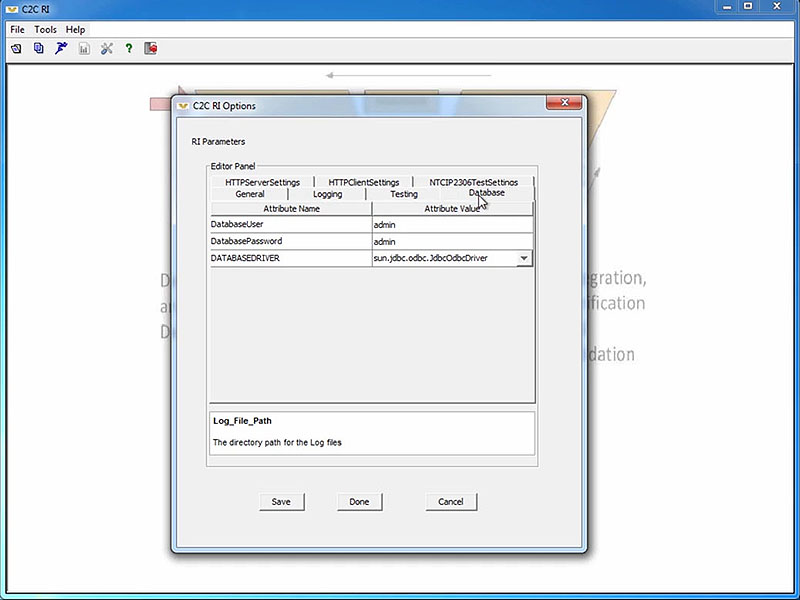
(Extended Text Description: Initial C2C RI Configuration - frame 7 of 10. Please see prior frames of this short video clip for more information. Author's relevant narration of this frame: [check on other tabs, default directories].)

(Extended Text Description: Initial C2C RI Configuration - frame 8 of 10. Please see prior frames of this short video clip for more information. Author's relevant narration of this frame: [check on other tabs, default directories].)

(Extended Text Description: Initial C2C RI Configuration - frame 9 of 10. Please see prior frames of this short video clip for more information. Author's relevant narration of this frame: Once you're done, you can click on Save and then...)
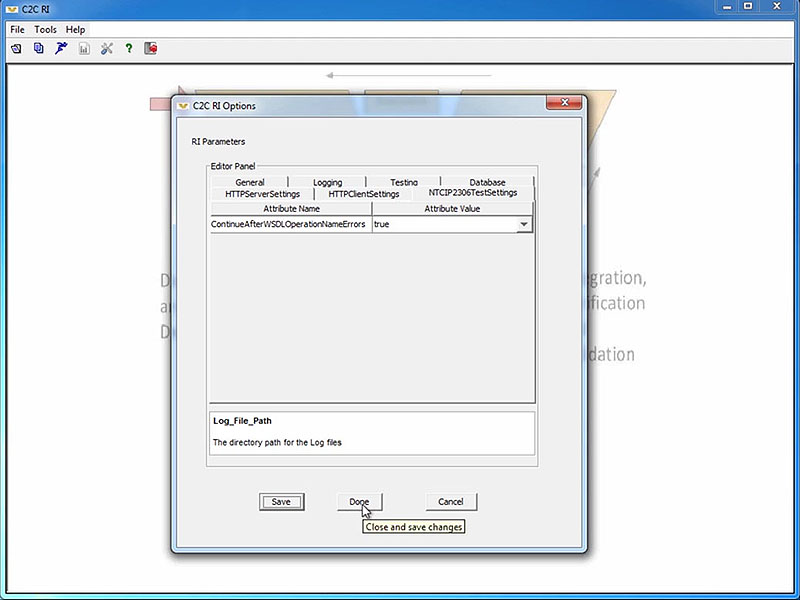
(Extended Text Description: Initial C2C RI Configuration - frame 10 of 10. Please see prior frames of this short video clip for more information. Author's relevant narration of this frame: ... click on Done.)
Slide 21:
Basic Configuration
Configure the Owner Center WSDL File
Discovery of Services
- NTCIP 2306 requires the use of a Web Services Description Language (WSDL) file to define supported services
- The Owner Center should define its own WSDL file properly configured
- WSDL is based on XML
-
Primary purpose of WSDL is to define supported services
- Also used to auto-configure the C2C RI
Slide 22:
Basic Configuration
Configure the Owner Center WSDL File
WSDL Defines:
- Schema files that define data structures
- Messages using data structures
- Operations that define message sequences
- Ports on which the operations are available
- Bindings mapping operations to protocols
- Services mapping bindings to URLs
C2C RI does not automatically customize to your URL
Slide 23:
Basic Configuration
Configure the Owner Center WSDL File
WSDL files are associated with the Owner Center C2C RI as External Center:
-
C2C RI will check the provided WSDL file for conformance
- Some tools do not produce NTCIP 2306-conformant WSDL files
C2C RI as Owner Center:
- You'll need to customize the default WSDL files to use your URL
- All of the changes are in the last few lines of the file
C2C RI provides sample WSDL files; our example uses
<C2C RI Directory>/Test Files/release2+.wsdl
Slide 24:
Basic Configuration
Configure the Owner Center WSDL File
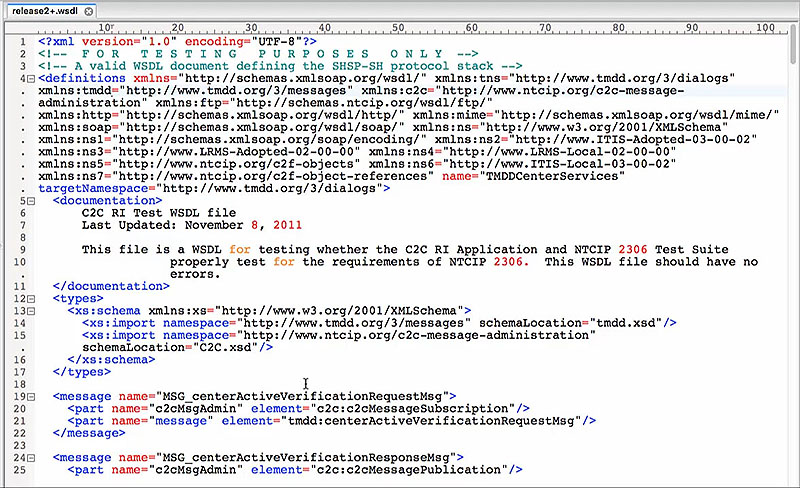
(Extended Text Description: Configure the Owner Center WSDL File - frame 1 of 3. Please note, this slide contains a short video clip. The author's relevant key message and transcript of the video clip, along with key still frames of the video clip are presented below.
Author's relevant narration of this frame: You can open the WSDL file in any standard text editor. The WSDL file tends to be rather large. This is actually a fairly simple one showing only a few messages.
Key message/narrative of overall video clip: The edits necessary to the default WSDL file. You can open the WSDL file using any standard text editor. The WSDL file tends to be rather large; this is a relatively simple one showing only a few messages. But if you scroll to the very bottom of the file, you'll find sections labeled "OWNER CENTER Services" and "EXTERNAL CENTER Services". The portion that you need to change is the "location" attribute of the "SOAP address" for each defined owner center "port." In this example, the "tmddOCSoapHttpServicePort" has a location of http://CRCRIOC:8080/SoapTry. This location address needs to be updated so that it points to the actual URL where the service will be instantiated. In other words, for a C2C RI acting as an owner center, we need to change the "C2CRIOC" portion of the address to an actual IP address or domain name. In this example, our local IP address is "10. 211.55.1," so we replace the "C2CRIOC" with that IP address. We then copy that address and replace all other occurrences of "C2CRIOC" within the OWNER CENTER Services section as well. We do not need to worry about replacing any EXTERNAL CENTER instances of the address because that will be handled automatically by the system at runtime. We only need to modify the OWNER CENTER instances; the EXTERNAL CENTER instance will have no effect. Once you have made the edits, you can save the file and close your file.)
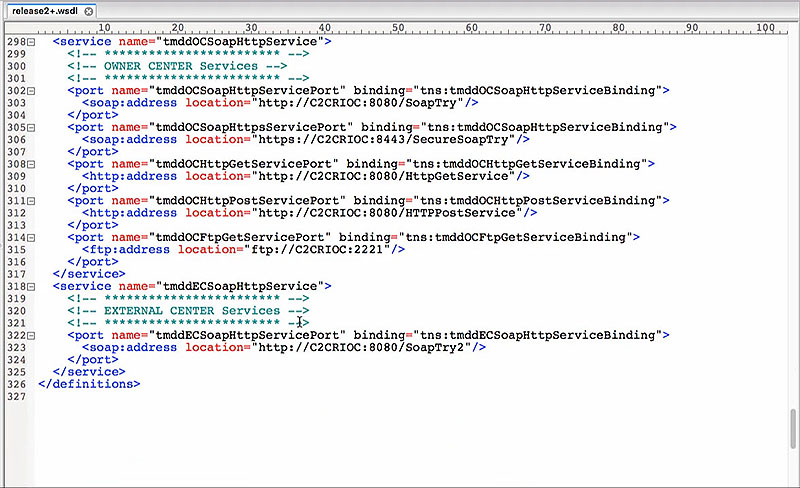
(Extended Text Description: Configure the Owner Center WSDL File - frame 2 of 3. Please see prior frames of this short video clip for more information. Author's relevant narration of this frame: But if you scroll to the very bottom of the file, you'll find a section, External Center Bindings and Owner Center Services, then finally External Sensor Services. The portion you need to change is the web address. Here we see that the Owner Center Services has a location of http://C2CRIOC. That is the address you need to change.)

(Extended Text Description: Configure the Owner Center WSDL File - frame 3 of 3. Please see prior frames of this short video clip for more information. Author's relevant narration of this frame: You need to change it to your IP address. In my case, the address is 10.211.55.1, and we just replace that value straight down to all of the occurrences that you see that in your file. In the case of the External Center, you actually don't need to change that value, because the Owner Center does not know the address of the External Center that is provided during runtime. So you only need to change the Owner Center values. Once you've done that, you can save your values and then you're done.)
Slide 25:
Basic Configuration
Configure the C2C RI to Use WSDL File
(Extended Text Description: Configure the C2C RI to Use WSDL File - frame 1 of 5. Please note, this slide contains a short video clip. The author's relevant key message and transcript of the video clip, along with key still frames of the video clip are presented below.
Author's relevant narration of this frame: Now that we've saved our updated WSDL file, the next step is to link the C2C RI configuration file to the WSDL file.
Key message/narrative of overall video clip: Visually explain steps to configure the C2C RI to point to the WSDL file. Now that we've saved our updated WSDL file, the next step is to link the C2C RI configuration file to the WSDL file. To do this, we'll open and edit our sample configuration file. This example is based on the NTCIP 2306 test WSDL file, so we'll open the NTCIP2306OCS configuration file. We then select the "System Under Test" tab and make sure that the "Web Services URL" address is appropriately set. Since we are acting as an owner center, the WSDL file we just edited is stored locally on our machine and the address starts with file://localhost/c:/ Followed by the path and filename (c2cri/testfiles/release2+.wsdl). If we were editing the External Center configuration file, we would either need to reference the URL address of the WSDL file on the owner center server (for example with an http:// address) or we would need to download a copy of that file to our local machine and then reference it with a local URL address that would start with file://localhost. NOTE: We do not need to worry about setting the IP address, port, or host name fields. The settings in the WSDL file override the values set in these fields and these fields have no effect in the current version of the C2C RI. Once the Web Service URL is properly configured, you can click the "Close" button and save the file at the prompt.)
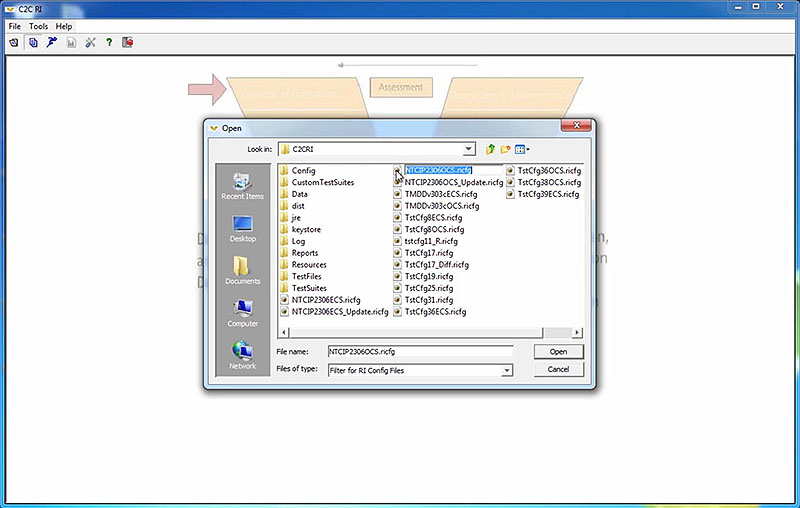
(Extended Text Description: Configure the C2C RI to Use WSDL File - frame 2 of 5. Please see prior frames of this short video clip for more information. Author's relevant narration of this frame: To do this, we'll open and edit our sample configuration file. This example is based on the NTCIP 2306 test WSDL file. So I'll open the NTCIP2306OCS configuration file, and then C2C RI will operate as an Owner Center.)
(Extended Text Description: Configure the C2C RI to Use WSDL File - frame 3 of 5. Please see prior frames of this short video clip for more information. Author's relevant narration of this frame: We then select the system under Test tab, and make sure that the web services URL address is appropriately set.)
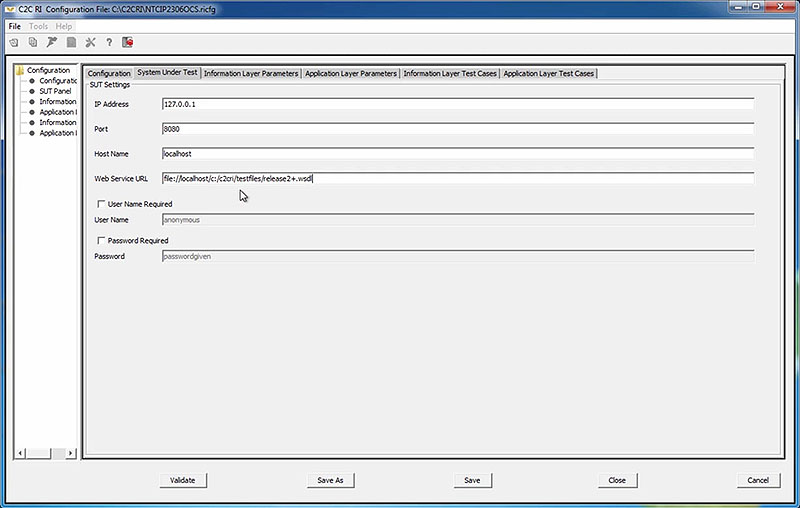
(Extended Text Description: Configure the C2C RI to Use WSDL File - frame 4 of 5. Please see prior frames of this short video clip for more information. Author's relevant narration of this frame: Since we are acting as the Owner Center, the WSDL file we just edited is stored locally on our machine, and the address starts with file://localhost/c:/ followed by the path and the filename.)

(Extended Text Description: Configure the C2C RI to Use WSDL File - frame 5 of 5. Please see prior frames of this short video clip for more information. Author's relevant narration of this frame: If we were editing the External Center configuration file, we would either need to reference the URL address of the WSDL file on the Owner Center server-- for example, with an HTTP address-- or we would need to download a copy of that file to our local machine and then reference it with a local URL address that would start similarly with a file local host address. Note we do not need to worry about the IP Address, Port, or Host Name fields. This is because the WSDL file overrides these values. Right now these fields have no effect on the current version of the C2C RI. Once the web server's URL is properly configured, you can click the Close button and save the file at the prompt.)
Slide 26:
Configuration for a Specific Test
Configure the Needs and Requirements to Test

(Extended Text Description: Configure the Needs and Requirements to Test - frame 1 of 8. Please note, this slide contains a short video clip. The author's relevant key message and transcript of the video clip, along with key still frames of the video clip are presented below.
Author's relevant narration of this frame: The next step is to configure the C2C RI for a specific test.
Key message/narrative of overall video clip: Visually explain the process to identify the test cases that relate to the selected requirements and user needs. The next step is to configure the C2C RI for a specific test. To do this, open the configuration file and go to the appropriate "Layer Parameters" tab. In our example, we're testing the lower layers, so we will go to the "Application Layer Parameters" tab. Here, we can indicate which standardized options we want the C2C RI to test. The settings on these tabs will limit which test cases are visible when you are in the C2C RI "execute" mode. The table structure follows the Needs to Requirements Traceability Matrix defined in the standards and should be filled out based on the options supported by your system under test to ensure that you can run all applicable tests once you're in the execute mode. The upper portion of the screen indicates the user needs defined in the standard. Any items that the standard defines as "mandatory" will be flagged for testing without any option to remove the flag. Users may flag "optional" needs as desired. In this example, there are three options, and we have flagged all three for testing. Your configuration should reflect the capabilities of the system that you are testing. Selecting one of the rows of the Need table will automatically populate entries in the Requirements table. This table works in a similar manner as above. Items that are mandatory will always be flagged; optional items can be flagged as needed. The test parameters table is provided when the standardized Needs to Requirements Traceability Matrix has additional parameters defined for a requirement. This does not occur within NTCIP 2306, but we can look at the "Information Layer Parameters" tab to see how this works. For example, if we select the Verify Connection Active user need and the Send Center Active Verification Upon Request requirement, the Test Parameters table is populated with one entry that describes the required response time for the owner center. The test procedure uses this value to determine how long to wait for a response prior to failing the response step. As with all of the other entries on this screen, the value assigned for this parameter should be based on the advertised capabilities of the system under test. Once you are done with your selections, you can select the Close button and save your settings at the prompt.)
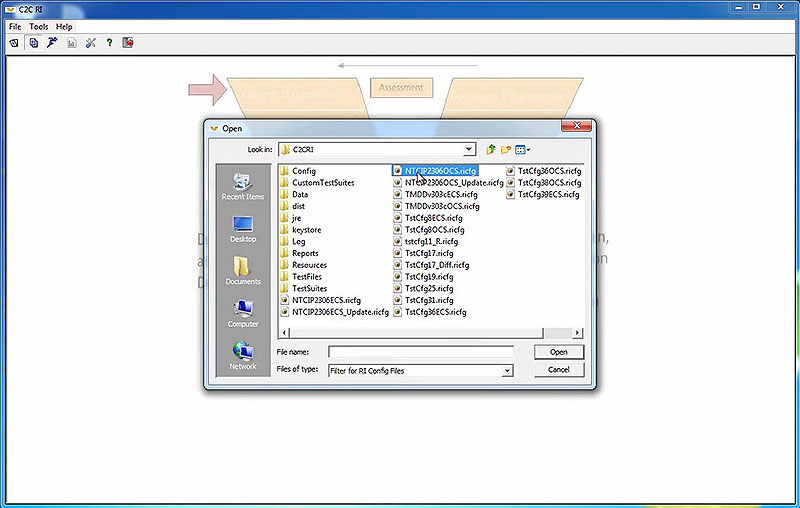
(Extended Text Description: Configure the Needs and Requirements to Test - frame 2 of 8. Please see prior frames of this short video clip for more information. Author's relevant narration of this frame: To do this, open the configuration file...)

(Extended Text Description: Configure the Needs and Requirements to Test - frame 3 of 8. Please see prior frames of this short video clip for more information. Author's relevant narration of this frame: ...and go to the appropriate "Layer Parameters" tab. In our example, we're testing the lower layers, so we will go to the "Application Layer Parameters" tab.)

(Extended Text Description: Configure the Needs and Requirements to Test - frame 4 of 8. Please see prior frames of this short video clip for more information. Author's relevant narration of this frame: Here, we can indicate which standardized options we want the C2C RI to test. The settings on these tabs will limit which test cases are visible when you are in the C2C RI "execute" mode. The table structure follows the Needs to Requirements Traceability Matrix defined in the standards and should be filled out based on the options supported by your system under test to ensure that you can run all applicable tests once you're in the execute mode. The upper portion of the screen indicates the user needs defined in the standard. Any items that the standard defines as "mandatory" will be flagged for testing without any option to remove the flag. Users may flag "optional" needs as desired. In this example, there are three options, and we have flagged all three for testing. Your configuration should reflect the capabilities of the system that you are testing.)
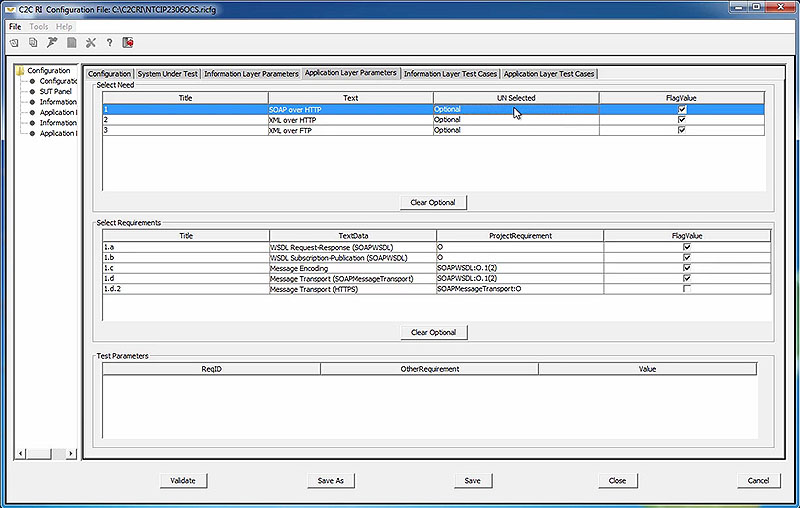
(Extended Text Description: Configure the Needs and Requirements to Test - frame 5 of 8. Please see prior frames of this short video clip for more information. Author's relevant narration of this frame: Selecting one of the rows of the Need table will automatically populate entries in the Requirements table. This table works in a similar manner as above. Items that are mandatory will always be flagged; optional items can be flagged as needed.)
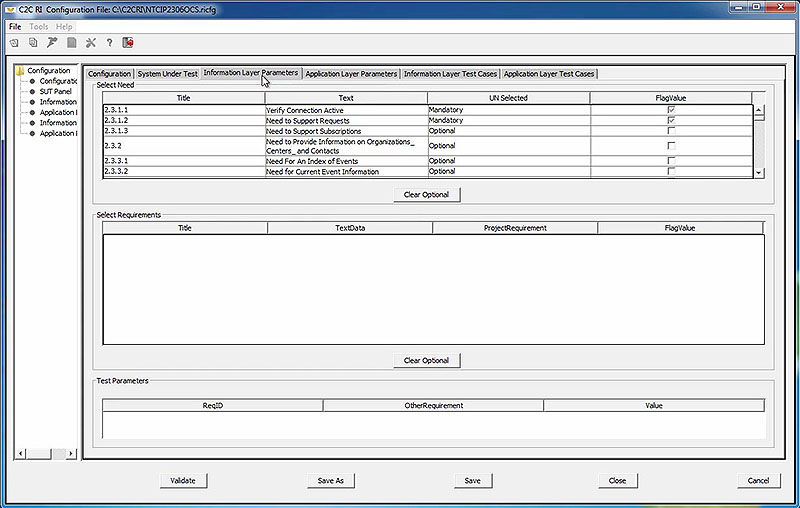
(Extended Text Description: Configure the Needs and Requirements to Test - frame 6 of 8. Please see prior frames of this short video clip for more information. Author's relevant narration of this frame: The test parameters table is provided when the standardized Needs to Requirements Traceability Matrix has additional parameters defined for a requirement. This does not occur within NTCIP 2306, but we can look at the "Information Layer Parameters" tab to see how this works.)

(Extended Text Description: Configure the Needs and Requirements to Test - frame 7 of 8. Please see prior frames of this short video clip for more information. Author's relevant narration of this frame: For example, if we select the Verify Connection Active user need and the Send Center Active Verification Upon Request requirement, the Test Parameters table is populated with one entry that describes the required response time for the owner center. The test procedure uses this value to determine how long to wait for a response prior to failing the response step. As with all of the other entries on this screen, the value assigned for this parameter should be based on the advertised capabilities of the system under test.)
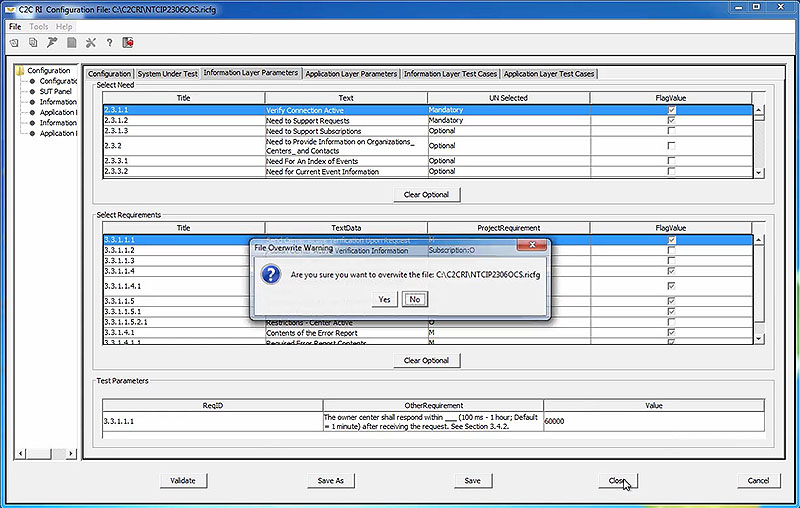
(Extended Text Description: Configure the Needs and Requirements to Test - frame 8 of 8. Please see prior frames of this short video clip for more information. Author's relevant narration of this frame: Once you are done with your selections, you can select the Close button and save your settings at the prompt.)
Slide 27:
Configuration for a Specific Test
Ready to Test
Your test case is now ready to test
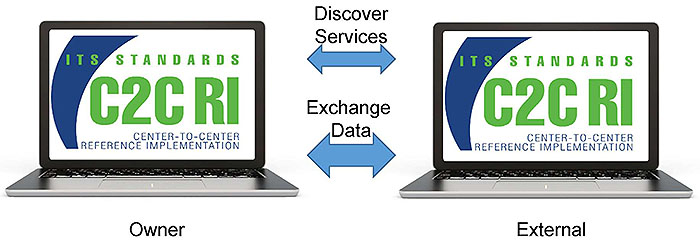
(Extended Text Description: Ready to test: This slide depicts the same center-to-center exchange environment as described on the previously on slides 13 and 14, except both centers have been replaced with the image of a laptop running the C2C RI.)
Slide 28:

Slide 29:
Question
What is the primary purpose of a WSDL file?
Answer Choices
- Configure the C2C RI
- Report errors to the user
- Define the services offered by the owner center
- All of the above
Slide 30:
Review of Answers
 a) Configure the C2C RI
Incorrect. While the C2C RI uses the WSDL file, the purpose of the file is much broader and includes operational deployment.
 b) Report errors to the user
Incorrect. The WSDL file does not report errors.
 c) Define the services offered by the owner center
Correct! The WSDL file defines the services offered by the owner center and how remote systems can access these services.
 d) All of the above
Incorrect. Options A and B are incorrect.
Slide 31:
Learning Objectives
- Install and configure the C2C RI on a PC
- Operate the C2C RI
Slide 32:
Learning Objective 2
- Operate the C2C RI
Slide 33:
Request - Reply Exchange
Start a Test - Owner Center

(Extended Text Description: Start a Test - Owner Center - frame 1 of 23. Please note, this slide contains a short video clip. The author's relevant key message and transcript of the video clip, along with key still frames of the video clip are presented below.
Key message/narrative of overall video clip: Visually explain how to start a test case on the owner center. To execute a test, select the execute option from the file menu, or select the execute button. The C2C RI will prompt you for a test name. In this case, since we're running as an owner center, we'll enter "OC_Test". We also need to select the configuration file that we want to use. We'll select the same configuration file we just customized, "NTCIP2306OCS.ricfg", meaning that this C2C RI instance will be acting as an owner center testing an external center. You can also enter notes about the test.
After we click on "Accept," the C2C RI will enter its "execute" mode. Since we are testing the lower layers, click on the "Application" tab in the left-hand window and then select an appropriate test case. You can see a description of each test by hovering over the test name.
We'll select the first test case, SHRR-EC, which tests to see if the external center (EC) can communicate using "SOAP over HTTP" (SH) for request-reply exchanges (RR).
We can now run our test by pressing the "Run" button. Many of the C2C RI test cases include variables that can be configured by the user. These variables can be set within data files or can be presented at prompts at the start of tests. By default, this test prompts the user for several values. The first value is the name of the service defined in the WSDL file that the tester wants to use for this test. Remember, this test is only testing NTCIP 2306 (i.e., the lower layers of the communications stack), but to test these layers, the C2C RI needs to send something in the upper layers. It doesn't matter what we send as long as the external center supports the information and it conforms to the parameters of this test (in other words, in this case it should be a request-reply SOAP over HTTP service since we chose the SHRR test case.)
We can find the service name by looking at the WSDL file. Back where we entered the address for our owner center, we discover the name of the service we were specifying was "tmddOCSoapHttpService". We can copy this name into the prompt.
The C2C RI then prompts us for the Subscription Port Name for Iteration 1. Once again, this is defined in the WSDL file. The "tmddOCSoapHttpService" includes several ports, the one for SOAP over HTTP is called "tmddOCSoapHttpServicePort". We'll copy this name into the prompt.
Next, the C2C RI prompts for the Subscription Operation Name. This is also defined in the WSDL file. In this case, we have to realize that the "tmddOCSoapHttpServicePort" is of type "tmddOCSoapHttpServiceBinding". If we search the WSDL file on that name, we discover it is defined to support a variety of operations. We'll pick the "OP_DMSInventoryRequest" operation to use for our example.
Finally, the C2C RI prompts for the Response Message for iteration 1. This is the actual instance of the XML message that the C2C RI owner center will respond with when an external center makes a request. The C2C RI does not generate this automatically and this is a key reason why the tester must be very familiar with XML and the TMDD standards. However, the WSDL file does reference the schema (that is, a template) for this message. If we search on the operation name, we discover that the output message (i.e., the message to be provided by the owner center) is the MSG_dMSInventoryMessage and if we search on that term, we discover that this message consists of a single part as defined by the TMDD's dmsInventoryMsg. We then just have to develop an instance of an XML message using the TMDD standard format and paste the resulting string into this prompt. Luckily, I already have a sample message saved that I will copy and paste into the program.
The owner center instance of the C2C RI now has all the necessary information to perform the test.)
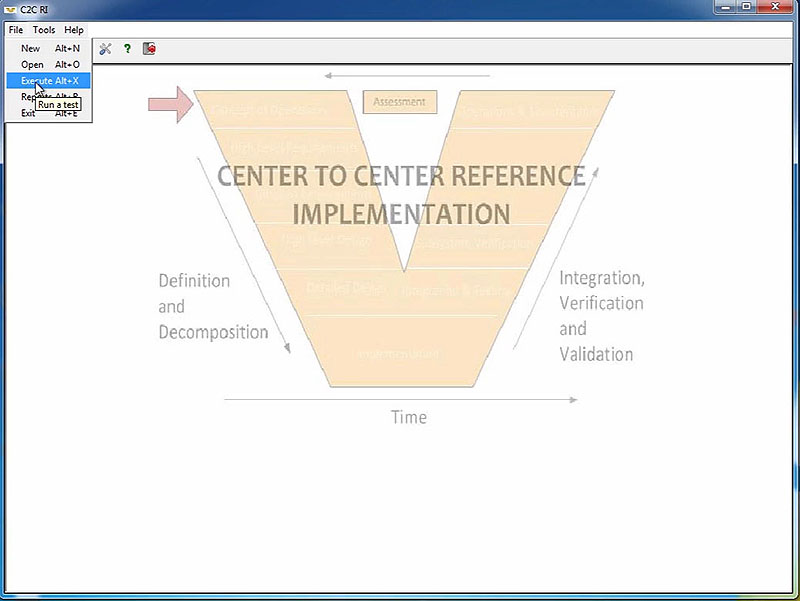
(Extended Text Description: Start a Test - Owner Center - frame 2 of 23. Please see prior frames of this short video clip for more information. Author's relevant narration of this frame: To execute a test, select the Execute option from the File menu, or select the Execute button.)

(Extended Text Description: Start a Test - Owner Center - frame 3 of 23. Please see prior frames of this short video clip for more information. Author's relevant narration of this frame: The C2C RI will prompt you for a test name. In this case we will enter OC, for Owner Center, Test. And select the configuration file. The configuration file we selected before was NTCIP2306OCS. After clicking on Accept, the C2C RI will enter its execute mode.)

(Extended Text Description: Start a Test - Owner Center - frame 4 of 23. Please see prior frames of this short video clip for more information. Author's relevant narration of this frame: Since we are testing the lower layers, click on the Application tab in the left-hand window...)
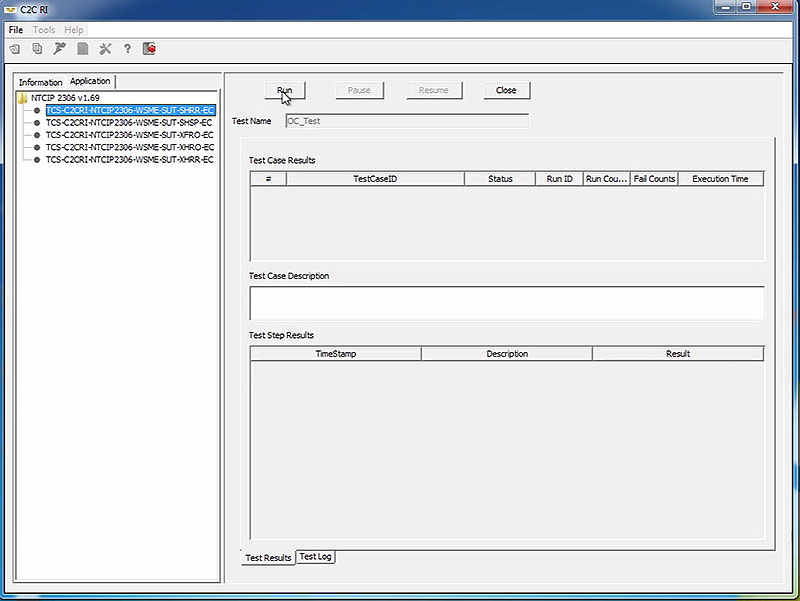
(Extended Text Description: Start a Test - Owner Center - frame 5 of 23. Please see prior frames of this short video clip for more information. Author's relevant narration of this frame: ...and then select an appropriate test case. You can see a description of each test by hovering over the test name. We'll select the first test case, which is SHRREC. This test will test to see if the External Center, EC, can communicate using SOAP over HTTPSH for request-reply exchanges, RR. We can now run our test by pressing the Run button.)

(Extended Text Description: Start a Test - Owner Center - frame 6 of 23. Please see prior frames of this short video clip for more information. Author's relevant narration of this frame: Many of the C2C RI test cases include variables that can be configured by the user. These variables can be set within data files or can be presented at prompts at the start of tests. By default, this test prompts the user for several values. The first value is the name of the service defined in the WSDL file that the tester wants to use for this test. Remember, this test is only testing NTCIP 2306, i.e., the lower layers of the communication stack, but to test these layers, the C2C RI needs to send something in the upper layers. It doesn't matter what we send, as long as the External Center supports the information and conforms to the parameters of this test. In other words, this case, it should be request-reply SOAP over HTTP service, since we chose the SHRR test case.)
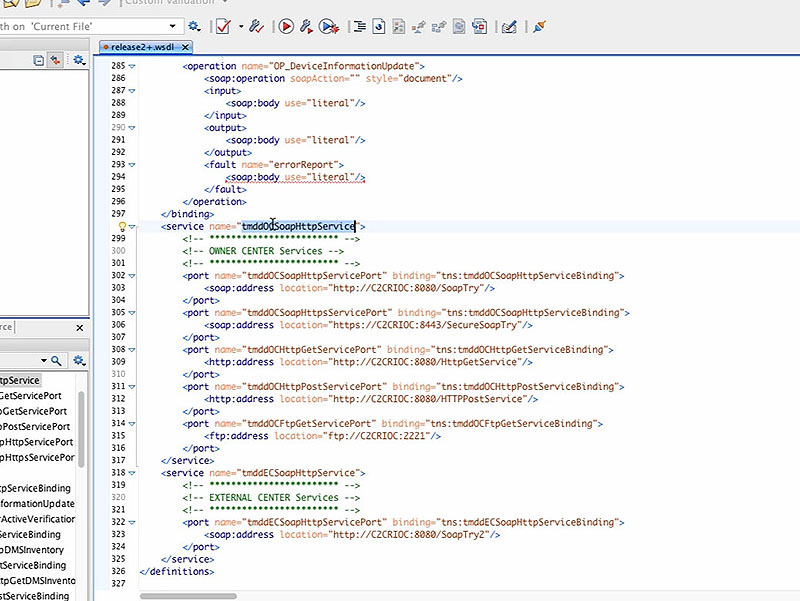
(Extended Text Description: Start a Test - Owner Center - frame 7 of 23. Please see prior frames of this short video clip for more information. Author's relevant narration of this frame: We can find the service name by looking at the WSDL file. Back where we entered the address for Owner Center, we discovered the name of the service we were specifying was tmddOCSoaphttpService.)
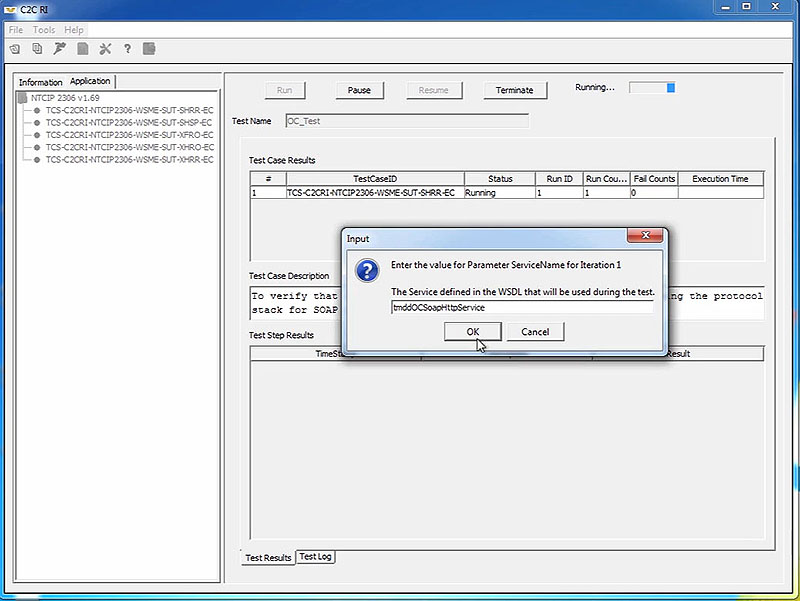
(Extended Text Description: Start a Test - Owner Center - frame 8 of 23. Please see prior frames of this short video clip for more information. Author's relevant narration of this frame: We can copy this name into the prompt.)

(Extended Text Description: Start a Test - Owner Center - frame 9 of 23. Please see prior frames of this short video clip for more information. Author's relevant narration of this frame: The C2C RI then prompts up for a subscription port name for iteration one.)
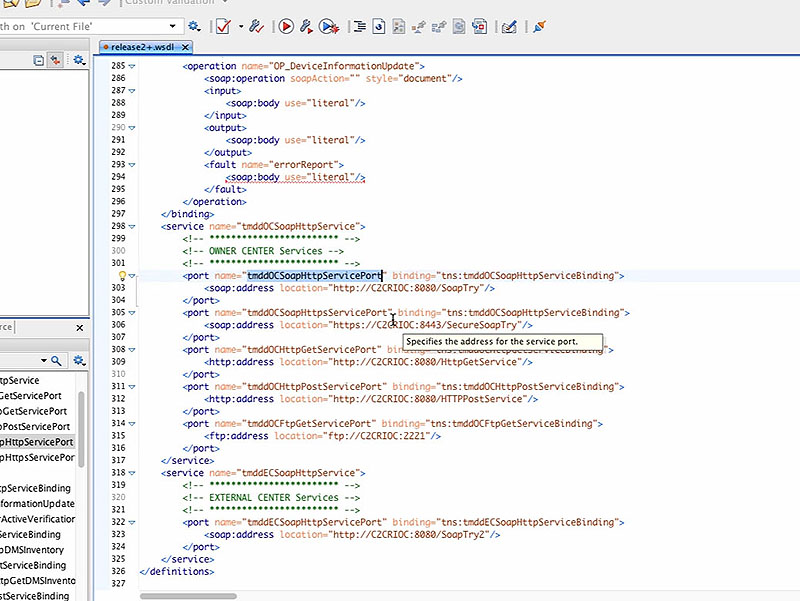
(Extended Text Description: Start a Test - Owner Center - frame 10 of 23. Please see prior frames of this short video clip for more information. Author's relevant narration of this frame: Once again, this is defined in the WSDL file. The tmddOCSoaphttpService includes several ports. The one for SOAP over HTTP is called tmddOCSoaphttpServicePort.)

(Extended Text Description: Start a Test - Owner Center - frame 11 of 23. Please see prior frames of this short video clip for more information. Author's relevant narration of this frame: We'll copy this name into the prompt.)
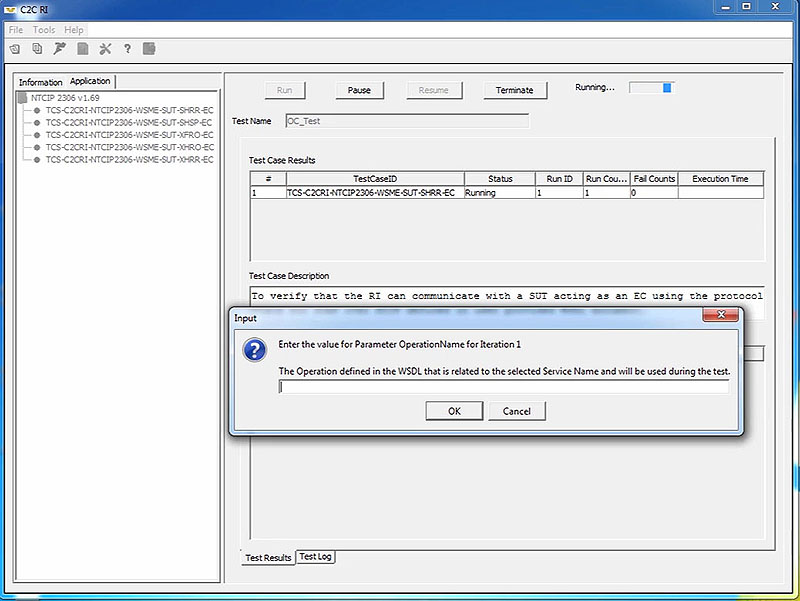
(Extended Text Description: Start a Test - Owner Center - frame 12 of 23. Please see prior frames of this short video clip for more information. Author's relevant narration of this frame: The C2C RI then prompts us for the subscription port name for iteration one.)

(Extended Text Description: Start a Test - Owner Center - frame 13 of 23. Please see prior frames of this short video clip for more information. Author's relevant narration of this frame: Once again, this is defined in the WSDL file. In this case, we have to realize that the tmddOCSoaphttpServicePort is of type tmddOCSoaphttpServiceBinding.)
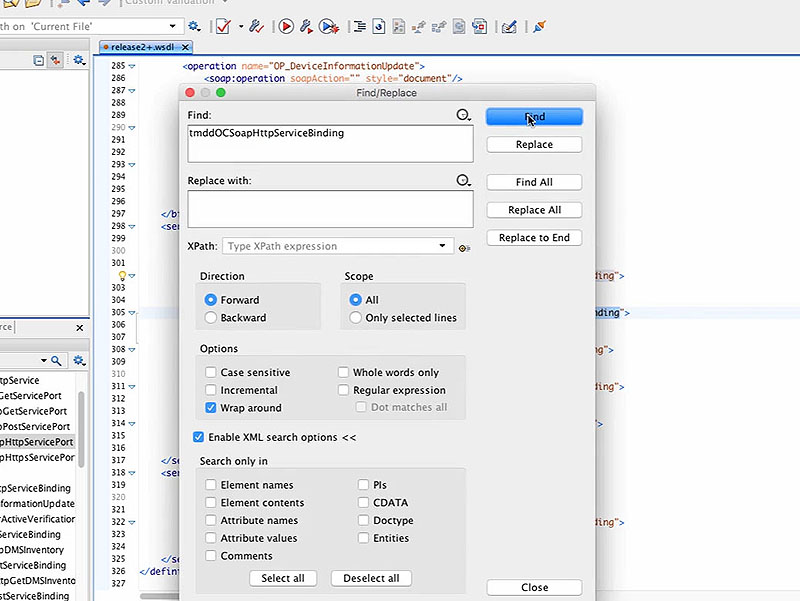
(Extended Text Description: Start a Test - Owner Center - frame 14 of 23. Please see prior frames of this short video clip for more information. Author's relevant narration of this frame: If we search the WSDL file for this name, we discover it is defined to support a variety of operations.)
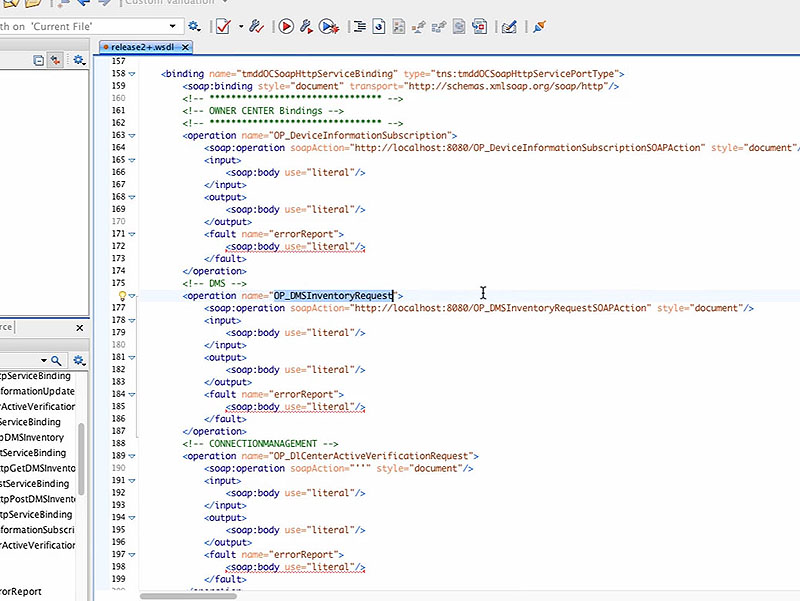
(Extended Text Description: Start a Test - Owner Center - frame 15 of 23. Please see prior frames of this short video clip for more information. Author's relevant narration of this frame: We'll pick the OP_DMSInventoryRequest.)
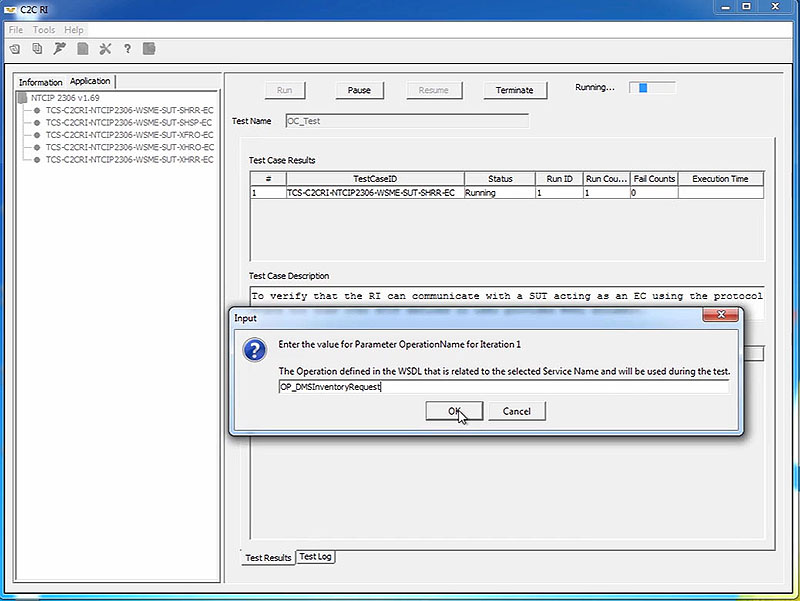
(Extended Text Description: Start a Test - Owner Center - frame 16 of 23. Please see prior frames of this short video clip for more information. Author's relevant narration of this frame: [copy into the prompt].)
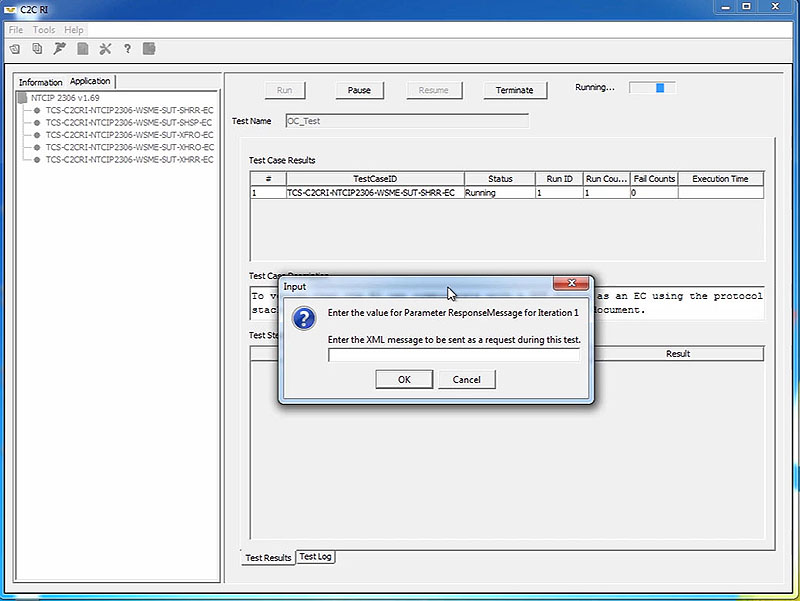
(Extended Text Description: Start a Test - Owner Center - frame 17 of 23. Please see prior frames of this short video clip for more information. Author's relevant narration of this frame: Finally, the C2C RI prompts for the response message for iteration one. This is the actual instance of the XML message that the C2C RI Owner Center will respond with when an External Center makes a request. The C2C RI does not generate this automatically, and this is a key reason why the tester must be very familiar with XML and the TMDD standards.)
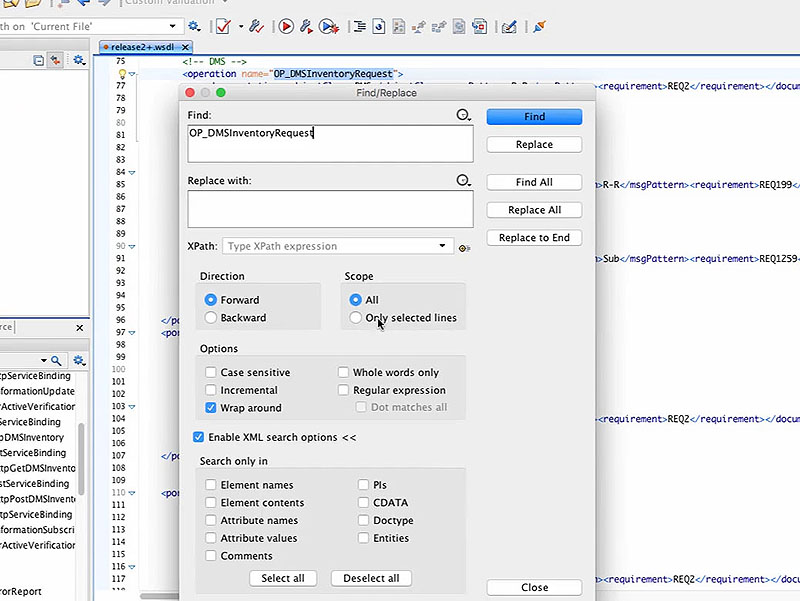
(Extended Text Description: Start a Test - Owner Center - frame 18 of 23. Please see prior frames of this short video clip for more information. Author's relevant narration of this frame: However, the WSDL file does reference the schema that is a template, for this message. If we search on the operation name...)
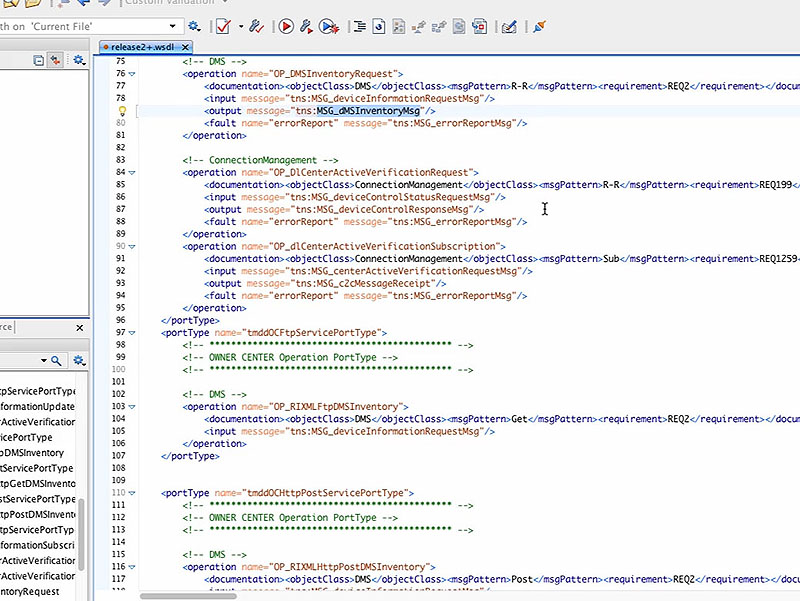
(Extended Text Description: Start a Test - Owner Center - frame 19 of 23. Please see prior frames of this short video clip for more information. Author's relevant narration of this frame: ...we discover that the output message, i.e., the message to be provided by the Owner Center, is the MSG_dMSInventoryMsg.)
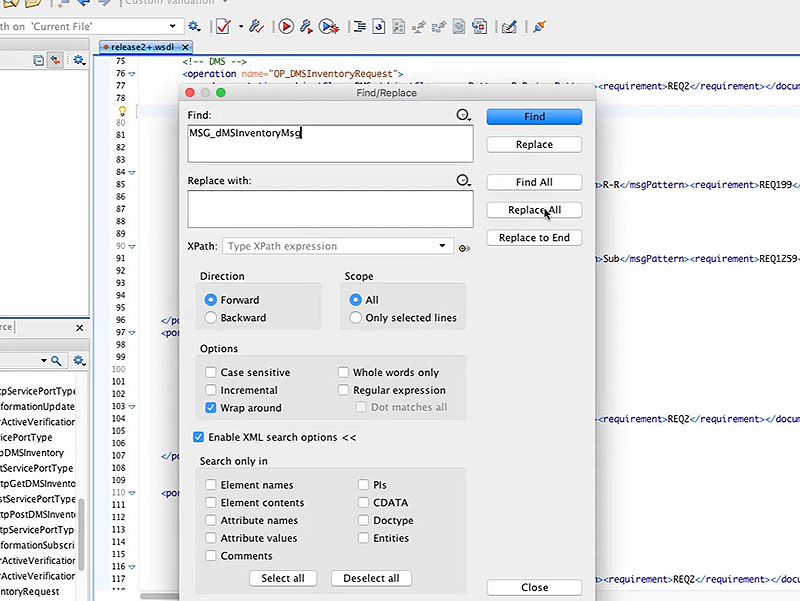
(Extended Text Description: Start a Test - Owner Center - frame 20 of 23. Please see prior frames of this short video clip for more information. Author's relevant narration of this frame: And if we search on that term...)
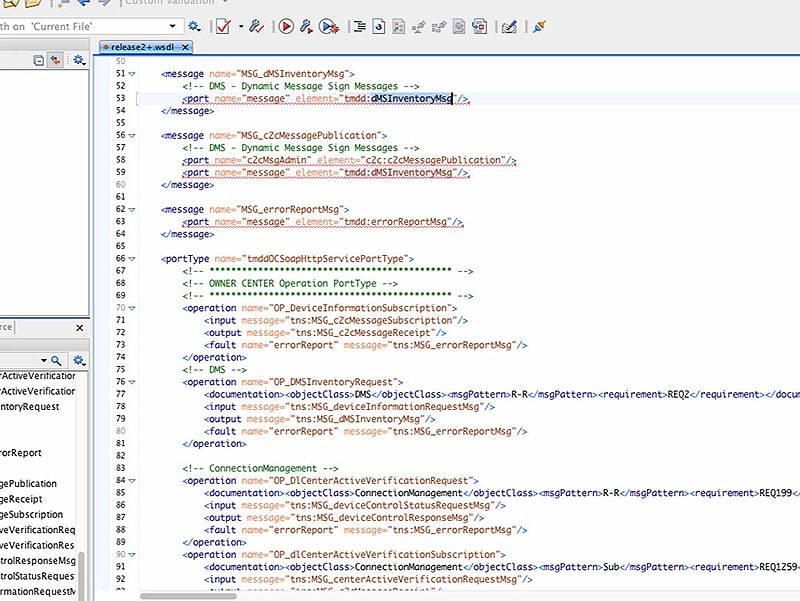
(Extended Text Description: Start a Test - Owner Center - frame 21 of 23. Please see prior frames of this short video clip for more information. Author's relevant narration of this frame: ...we discover that this message consists of a single part, as defined by tmdd:DMSInventoryMsg.)

(Extended Text Description: Start a Test - Owner Center - frame 22 of 23. Please see prior frames of this short video clip for more information. Author's relevant narration of this frame: We then just have to develop an instance of an XML message using the TMDD standard format and paste the resulting string into this prompt. Luckily, I already have a sample message saved...)
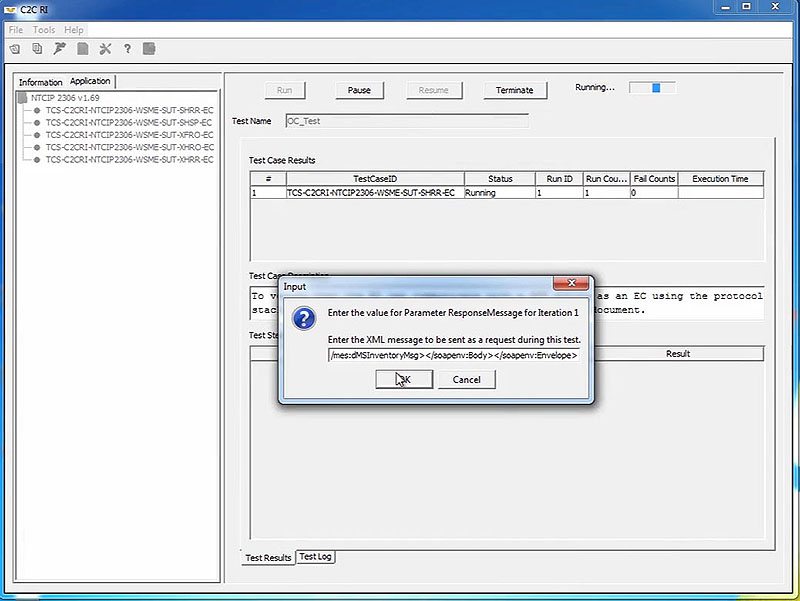
(Extended Text Description: Start a Test - Owner Center - frame 23 of 23. Please see prior frames of this short video clip for more information. Author's relevant narration of this frame: ...that I will copy and paste into the program. The Owner Center instance of the C2C RI now has all the necessary information to perform the test.)
Slide 34:
Request - Reply Exchange
Start a Test - External Center
(Extended Text Description: Start a Test - External Center - frame 1 of 9. Please note, this slide contains a short video clip. The author's relevant key message and transcript of the video clip, along with key still frames of the video clip are presented below.
Author's relevant narration of this frame: To run the test, we also need to make sure that our External Center is running...
Key message/narrative of overall video clip: Visually explain how to start a test on an external center Play. To run the test, we also need to make sure that our external center is running. To do this, we'll launch a second instance of the C2C RI. We follow the same process to start this instance, but we will use a configuration file that is set to run in external center mode rather than the owner center mode. Because we are running as an external center, we end up with a slightly different list of tests in our Application tab. To make sure that both instances expect the right sequence of messages, we need to make sure that we choose the complementary test case in the external center; in this case, it is the SHRR-OC test case. We then press the "Run" button as we did before and answer the prompts. The first three prompts will be answered the same as before – in other words, the external center should call the operation using the port and service that the owner center was configured to expect. However, the fourth prompt will have a different response. Whereas the owner center was configured with a response message, the external center will send the request message. The format of this message is also referenced in the WSDL file, but as the "input" flow to the OP_DMSInventoryRequest. Luckily, I also have a copy of a sample instance of this message stored locally. Now both instances of the C2C RI are ready to begin testing.)

(Extended Text Description: Start a Test - External Center - frame 2 of 9. Please see prior frames of this short video clip for more information. Author's relevant narration of this frame: To do this, we'll launch a second instance of the C2C RI. We follow the same process to start this instance, but we will use a configuration file that is set to run in External Center mode rather than the Owner Center mode.)
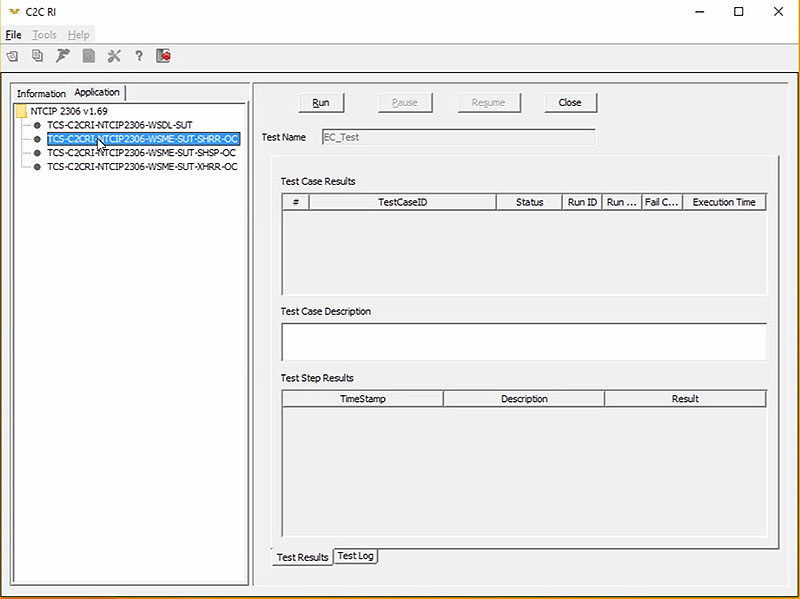
(Extended Text Description: Start a Test - External Center - frame 3 of 9. Please see prior frames of this short video clip for more information. Author's relevant narration of this frame: Because we are running as an External Center, we end up with a slightly different list of tests in our Application tab. To make sure that both instances expect the right sequence of messages, we need to make sure that we choose the complementary test case in the External Center. In this case, it is the SHRR-OC test case. We then press the Run button, as we did before, and answer the prompts.)

(Extended Text Description: Start a Test - External Center - frame 4 of 9. Please see prior frames of this short video clip for more information. Author's relevant narration of this frame: The first three prompts will be answered the same as before. In other words, the External Center should call the operation using the port and service that the Owner Center was configured to expect.)
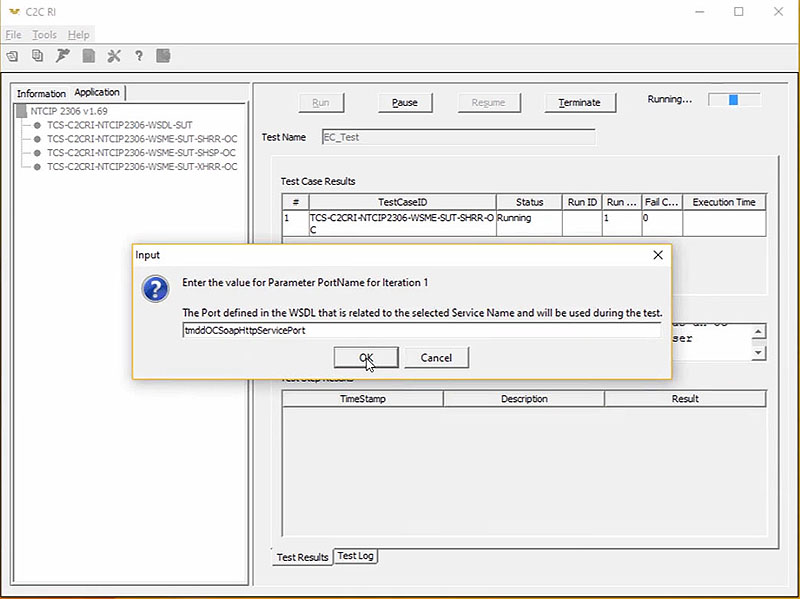
(Extended Text Description: Start a Test - External Center - frame 5 of 9. Please see prior frames of this short video clip for more information. Author's relevant narration of this frame: [second prompt])

(Extended Text Description: Start a Test - External Center - frame 6 of 9. Please see prior frames of this short video clip for more information. Author's relevant narration of this frame: [third prompt])
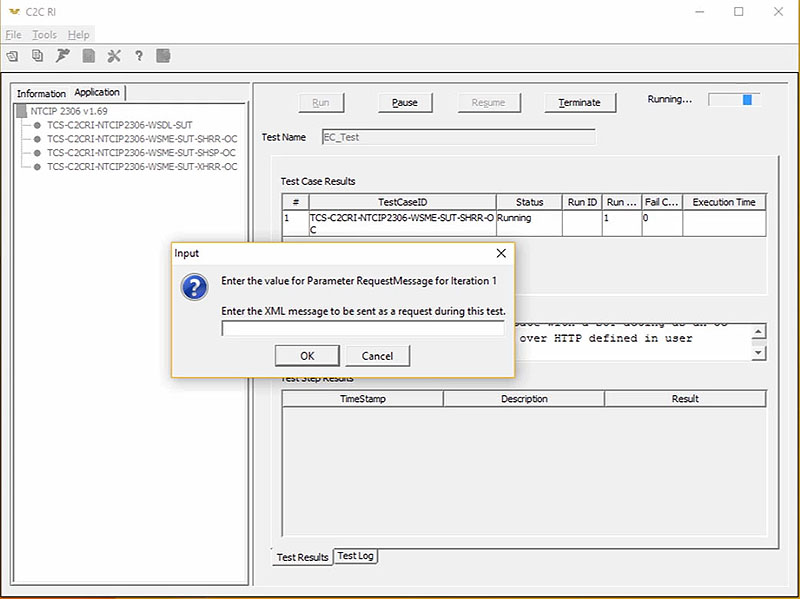
(Extended Text Description: Start a Test - External Center - frame 7 of 9. Please see prior frames of this short video clip for more information. Author's relevant narration of this frame: However, the fourth prompt will have a different response. Whereas the Owner Center was configured with a response message, the External Center will send the request message. The format of this message is also referenced in the WSDL file, but is the input flow to the OP DMS Inventory Request.)

(Extended Text Description: Start a Test - External Center - frame 8 of 9. Please see prior frames of this short video clip for more information. Author's relevant narration of this frame: Luckily, I also have a copy of this message stored locally.)
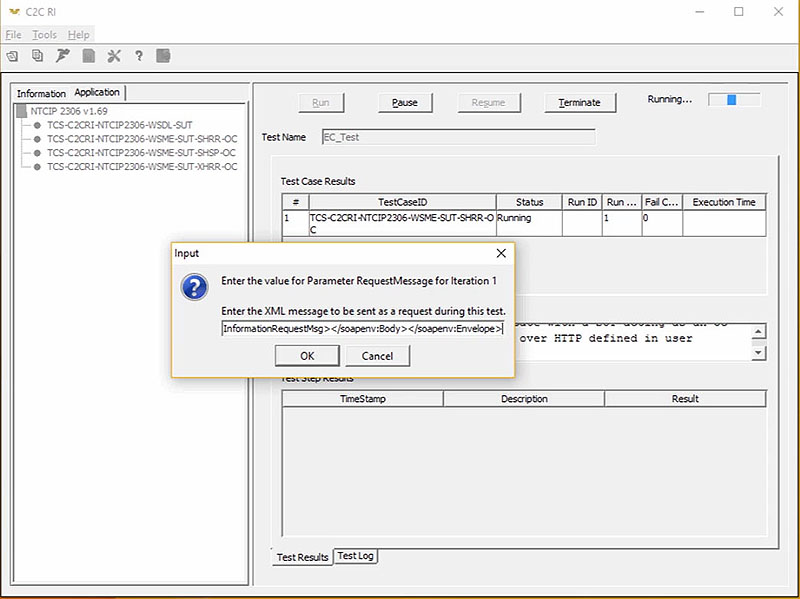
(Extended Text Description: Start a Test - External Center - frame 9 of 9. Please see prior frames of this short video clip for more information. Author's relevant narration of this frame: Now both instances of the C2C RI are ready.)
Slide 35:
Request - Reply Exchange
Finish the Test

(Extended Text Description: Finish the Test - frame 1 of 8. Please note, this slide contains a short video clip. The author's relevant key message and transcript of the video clip, along with key still frames of the video clip are presented below.
Key message/narrative of overall video clip: Visually explain how the interaction between the centers work. Now both C2C RI instances are running side-by-side with all the information that they need. The instance on the left is the owner center and the instance on the right is the external center. It is the tester's job to make sure that the two systems are ready for the exchanges to be tested. In the request/response model that we are using here, the owner center listens for incoming requests and responds when requests are received. As such, we need to make sure that the owner center is listening before the external center transmits its request. To do this, we'll accept our final input value on the owner center first; after some initial checks, the C2C RI will indicate that it is ready to receive an incoming request. Accept that message and then accept the final prompt on the external center instance. The External Center instance then performs various checks and eventually sends the request message to the owner center. The owner center instance then responds automatically and both instances process the information that was exchanged. The final results are recorded in the table at top, with more detailed information presented below. Once testing is complete, the user can terminate the test and exit the testing; the file will be saved automatically.)
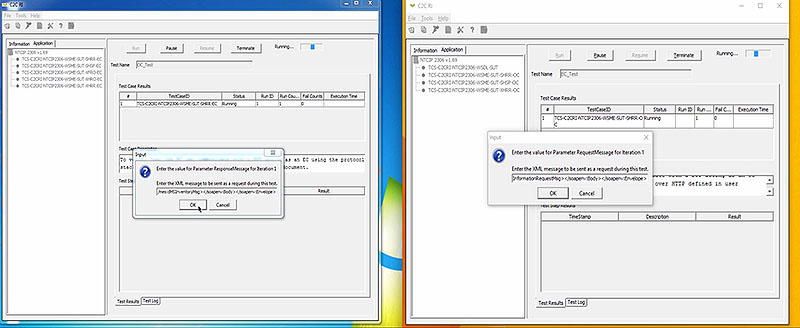
(Extended Text Description: Finish the Test - frame 2 of 8. Please see prior frames of this short video clip for more information. Author's relevant narration of this frame: To do this, we'll accept our final input value on the Owner Center first.)
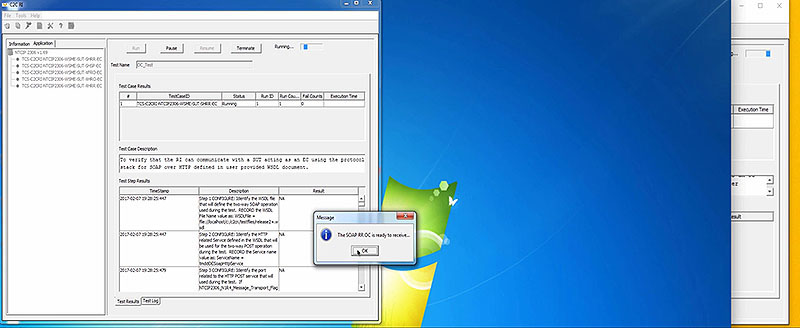
(Extended Text Description: Finish the Test - frame 3 of 8. Please see prior frames of this short video clip for more information. Author's relevant narration of this frame: After some initial checks, the C2C RI will indicate that it's ready to receive an incoming request.)

(Extended Text Description: Finish the Test - frame 4 of 8. Please see prior frames of this short video clip for more information. Author's relevant narration of this frame: We'll accept that message, and then accept the final prompt on the External Center.)

(Extended Text Description: Finish the Test - frame 5 of 8. Please see prior frames of this short video clip for more information. Author's relevant narration of this frame: The External Center instance then performs various checks and eventually sends the request message to the Owner Center. The Owner Center instance then responds automatically and both instances process the information that was exchanged. The final results are recorded at the top of the tables, and more detailed information at the lower tables.)
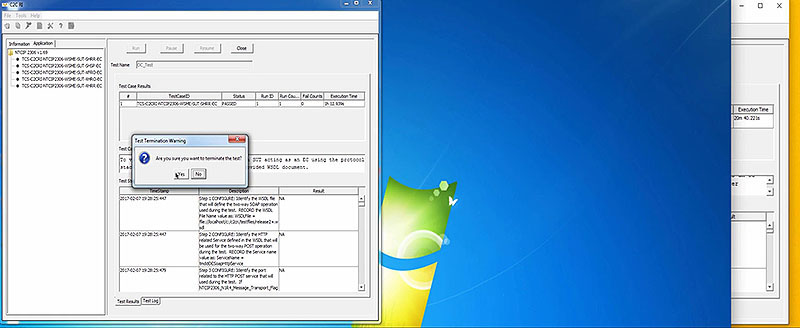
(Extended Text Description: Finish the Test - frame 6 of 8. Please see prior frames of this short video clip for more information. Author's relevant narration of this frame: Once testing is complete, the user can close the window and the file will be saved automatically.)
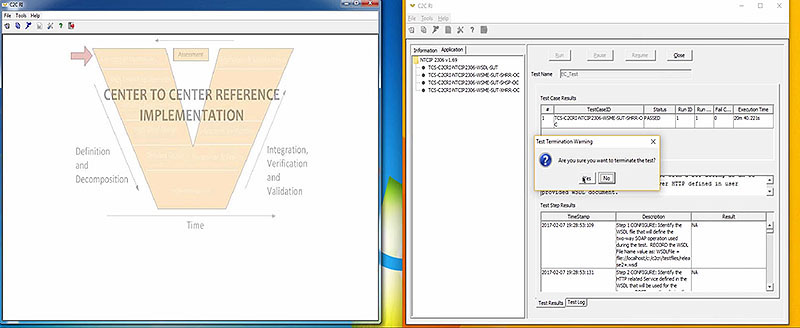
(Extended Text Description: Finish the Test - frame 7 of 8. Please see prior frames of this short video clip for more information. Author's relevant narration of this frame: [testing complete, save the file])

(Extended Text Description: Finish the Test - frame 8 of 8. Please see prior frames of this short video clip for more information. Author's relevant narration of this frame: [files saved, closing windows])
Slide 36:
Request - Reply Exchange
Repeating a Test - Data Files
Entering data at prompts can become time consuming
Text entered for messages has to be precise
- Prompt provides little screen space to double-check entry
- Any error can cause the test case to fail
C2C RI allows the user to define data files to automate the process
Slide 37:
Request - Reply Exchange
Testing with a Data File

(Extended Text Description: Testing with a Data File - frame 1 of 19. Please note, this slide contains a short video clip. The author's relevant key message and transcript of the video clip, along with key still frames of the video clip are presented below.
Key message/narrative of overall video clip: Visually explain how to test create and use data files Play video. You can create your custom C2C RI data file using any text editor, but the easiest way to make sure you define all of the needed parameters for the test case is to copy the default data files provided by the C2C RI itself. To do this, you'll need to extract the appropriate "data" file from the "jar" archive. This can be done with any file archiving software package that supports "jar" files; we'll use the 7-zip file manager.
Open 7-zip and navigate to the C2C RI installation directory and then go to the TestSuites subdirectory. This directory contains several files; open the "jar" file that corresponds to your test case. In our example, we want to customize a test case from the NTCIP 2306 test suite, so we will open the NTCIP2306v01_69Signed.jar file.
Inside of the jar file, open the appropriate Layer directory. The NTCIP 2306 jar file uses an AppLayer directory, whereas the TMDD jar file uses an InfoLayer directory. After opening the "Layer" directory, open the "Data" directory. You will now see a list of every test case defined in the test suite. Many of these tests are designed to test the C2C RI itself and will only appear in the C2C RI user interface if you use some advanced options. All you need to be concerned about are the file names that correspond with the test cases that you want to customize. In our case, this would be the files that start with "TCS-C2CRI-NTCIP2306-WSME-SUT-SHRR*.data"
Now we need to save these files to our desired location in an unencrypted format. 7-zip allows us to do this by right clicking on the files and selecting the "Copy To…" option, and then selecting the location we want to save to. Copies of these files are now stored in that location and we can open them in any text editor.
This is the default data file provided by the C2C RI. All we need to do is to edit the tags that say "#USERDEFINED#" to the actual values you would like to use. In our example, we'll enter the same values that we did before when we were using prompts; then we'll save the file.
We also make similar changes to the OC data file…
The final task is to modify the C2C RI configuration files to use the supplied data files. To do this, open the C2C RI configuration file; we'll start with the EC file. Select the <Layer> Test Cases tab. In our example, it will be the "Application Layer Test Cases" tab. This tab associates each test case with its source data file. If we scroll to the bottom of the list, we see our TCS-C2CRI-NTCIP2306-WSME-SUT-SHRR test cases. Configure each test case to its corresponding data file and then close and save the configuration. Repeat with the OC file.
Now we can launch our two instances of the C2C RI again. We'll start the OC first so that it will be ready to listen. This time, rather than prompting us for information, the tool immediately begins to perform checks and lets us know when it is ready to receive. After accepting the notice on the owner center instance, we can start the External Center and we discover that it also immediately begins the test without any prompts. This level of automation is critical for reliably repeating the performance of tests in an efficient manner.)
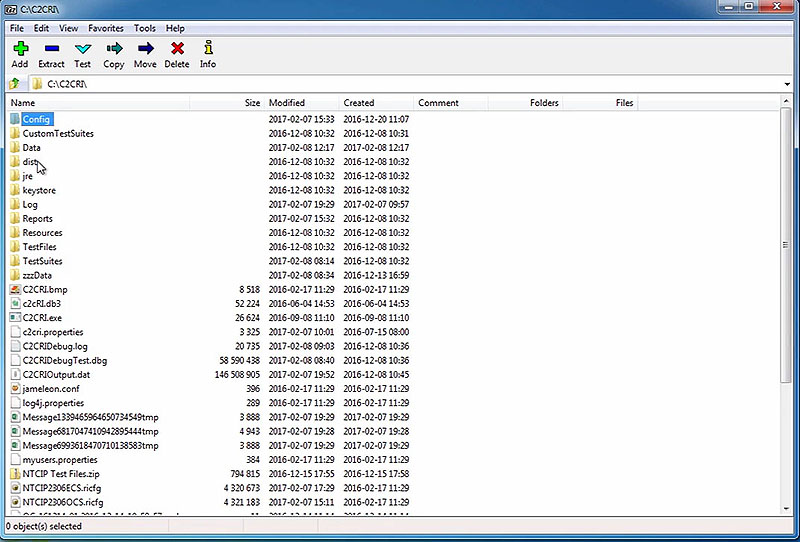
(Extended Text Description: Testing with a Data File - frame 2 of 19. Please see prior frames of this short video clip for more information. Author's relevant narration of this frame: We'll use the 7-Zip file manager. Open 7-Zip and navigate to the C2CRI installation directory...)
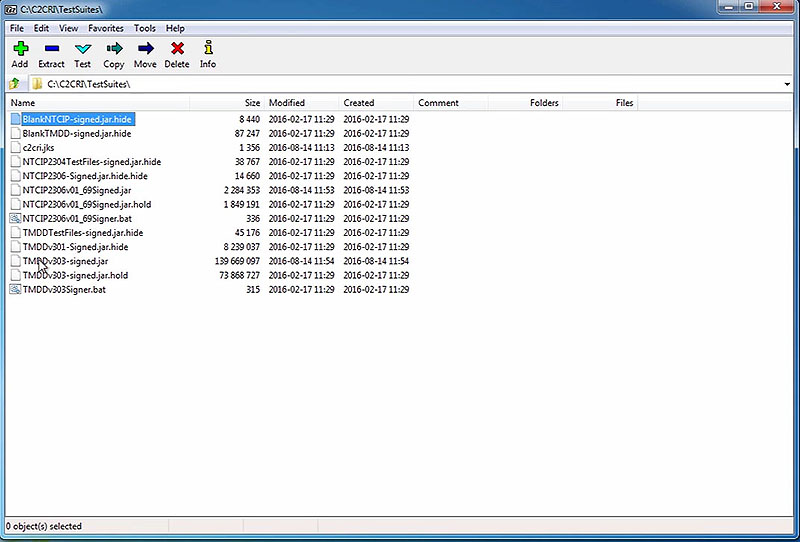
(Extended Text Description: Testing with a Data File - frame 3 of 19. Please see prior frames of this short video clip for more information. Author's relevant narration of this frame: ... then go to the TestSuites subdirectory. This directory contains several files. Open the JAR file that corresponds to your test case.)

(Extended Text Description: Testing with a Data File - frame 4 of 19. Please see prior frames of this short video clip for more information. Author's relevant narration of this frame: In our case, we're interested in the NTCIP2306 Test Suite, so we open that JAR file.)

(Extended Text Description: Testing with a Data File - frame 5 of 19. Please see prior frames of this short video clip for more information. Author's relevant narration of this frame: Inside of the JAR file, open the appropriate layer directory. In our case, we have an AppLayer directory.)
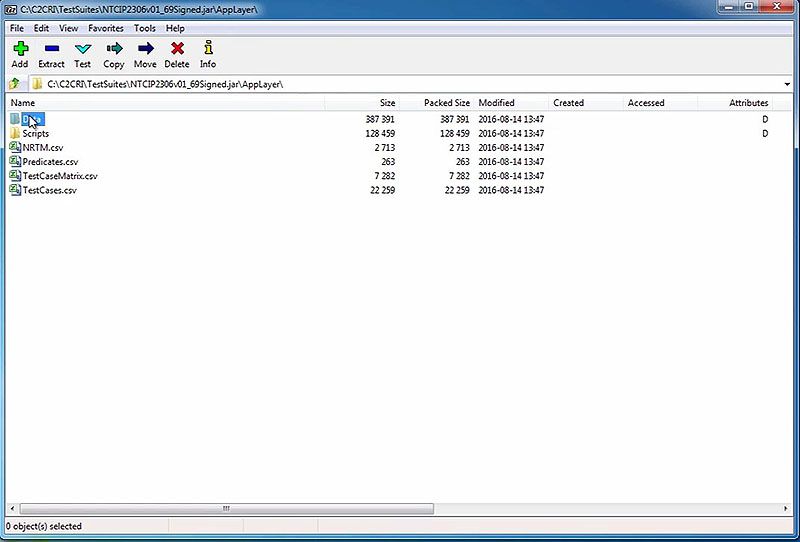
(Extended Text Description: Testing with a Data File - frame 6 of 19. Please see prior frames of this short video clip for more information. Author's relevant narration of this frame: The TMDD JAR file uses an InfoLayer directory. Open that directory, and then inside of that, open the Data directory.)
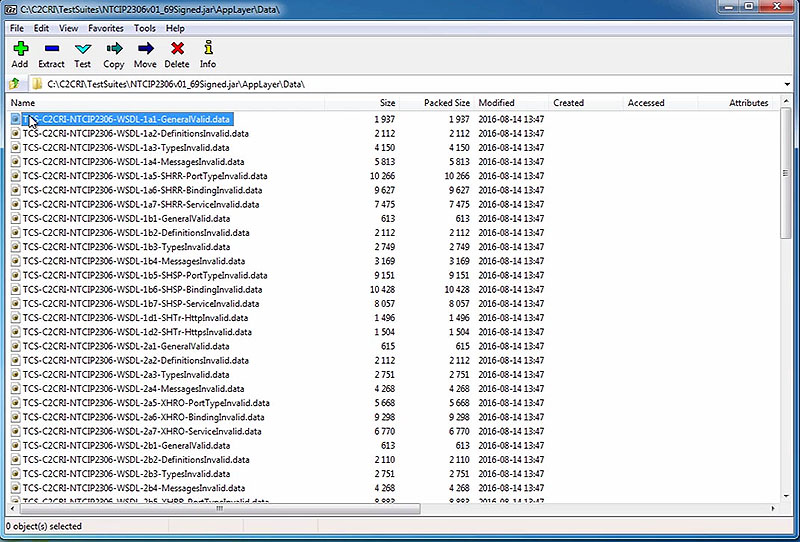
(Extended Text Description: Testing with a Data File - frame 7 of 19. Please see prior frames of this short video clip for more information. Author's relevant narration of this frame: You will now see a list of every test case defined in the Test Suite. Many of these tests are designed to test the C2C RI itself and will only appear in the C2C RI user interface if you use some advanced options. All that you need to be concerned about are the file names that correspond with the test cases that you want to customize.)

(Extended Text Description: Testing with a Data File - frame 8 of 19. Please see prior frames of this short video clip for more information. Author's relevant narration of this frame: In our case, we'll find these at the very bottom of the list, TCS-C2CRI-NTCIP2306-WSME-SUT-SHRR, and we want both the EC and the OC files.)
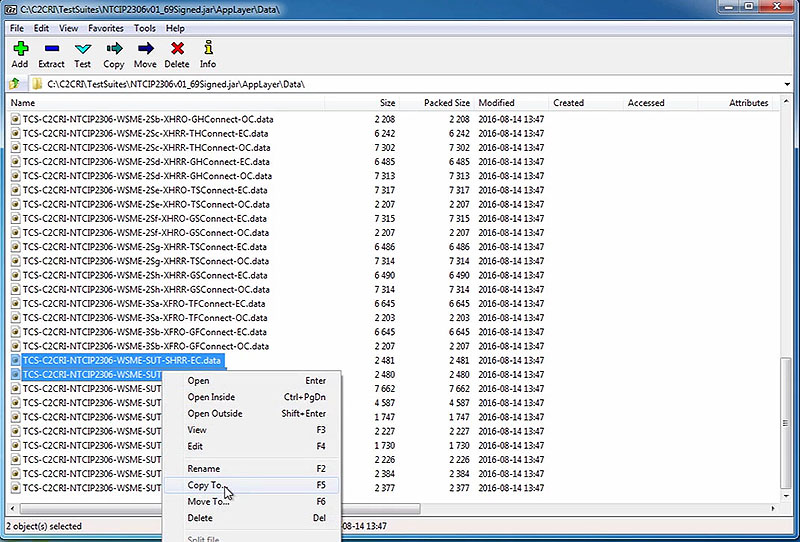
(Extended Text Description: Testing with a Data File - frame 9 of 19. Please see prior frames of this short video clip for more information. Author's relevant narration of this frame: . Now we need to save these files to our desired location in an unencrypted format. 7-Zip allows us to do this by right-clicking on the files and then selecting the Copy To option.)

(Extended Text Description: Testing with a Data File - frame 10 of 19. Please see prior frames of this short video clip for more information. Author's relevant narration of this frame: We can then select the location that we want to save to.)

(Extended Text Description: Testing with a Data File - frame 11 of 19. Please see prior frames of this short video clip for more information. Author's relevant narration of this frame: These files are now stored in that location and we can open them within any text editor.)
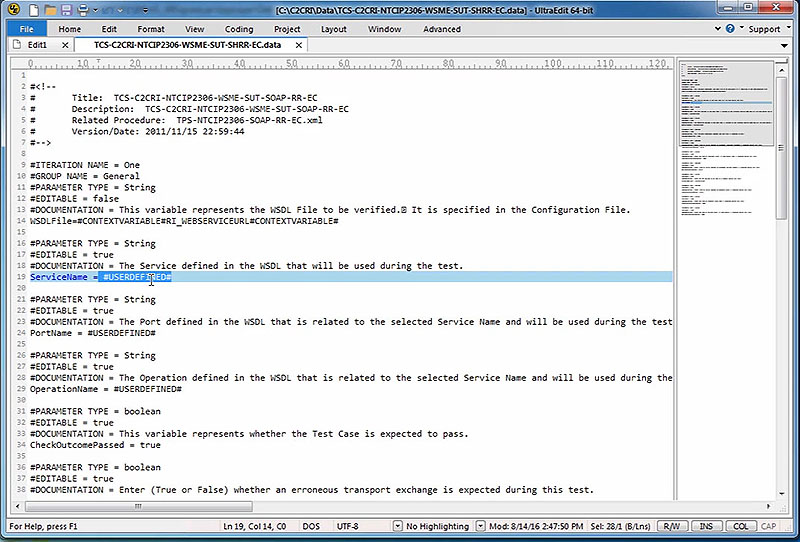
(Extended Text Description: Testing with a Data File - frame 12 of 19. Please see prior frames of this short video clip for more information. Author's relevant narration of this frame: This is the default data file provided by the C2C RI. All we need to do is to edit the tags that say USERDEFINED# to the actual values you would like to use.)
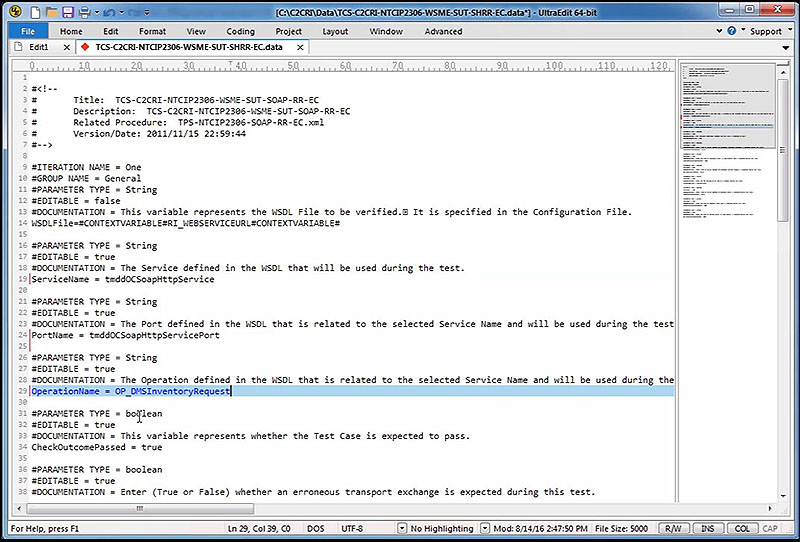
(Extended Text Description: Testing with a Data File - frame 13 of 19. Please see prior frames of this short video clip for more information. Author's relevant narration of this frame: In this case, we'll use the same values that we entered at the prompts before. And now we'll save the file. We also make similar changes to the OC data file.)

(Extended Text Description: Testing with a Data File - frame 14 of 19. Please see prior frames of this short video clip for more information. Author's relevant narration of this frame: The final task is to modify the C2C RI configuration files to use the supplied data files.)
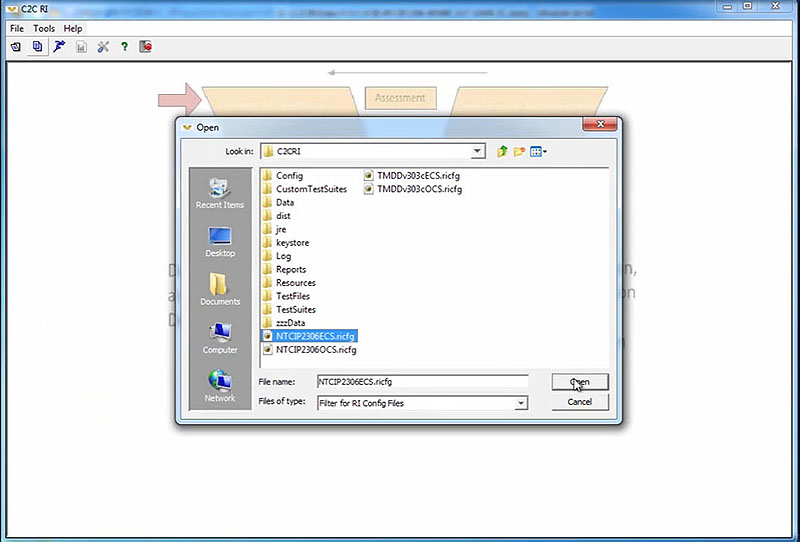
(Extended Text Description: Testing with a Data File - frame 15 of 19. Please see prior frames of this short video clip for more information. Author's relevant narration of this frame: To do this, open the C2C RI configuration file. We'll start with the EC file.)
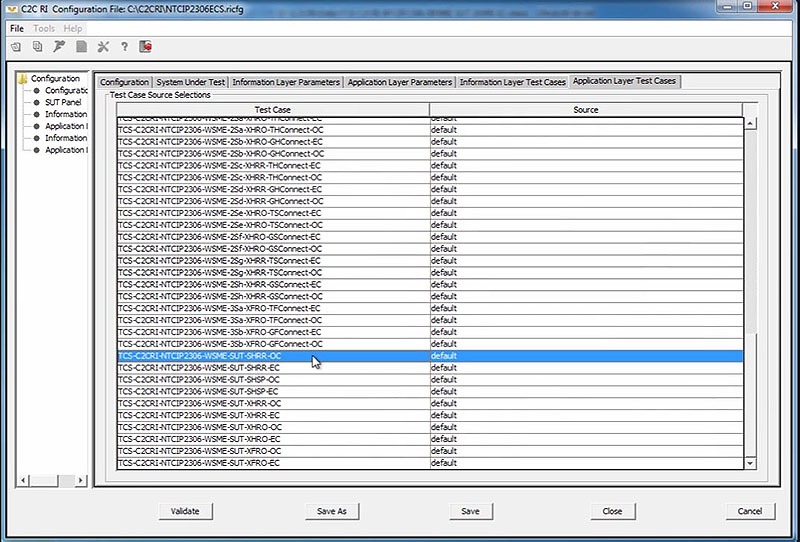
(Extended Text Description: Testing with a Data File - frame 16 of 19. Please see prior frames of this short video clip for more information. Author's relevant narration of this frame: Select the Layer Test Cases tab. In this case, we're dealing with the Application Layer, so we'll select the Application Layer Test Cases tab. Then go to the selected test case.)
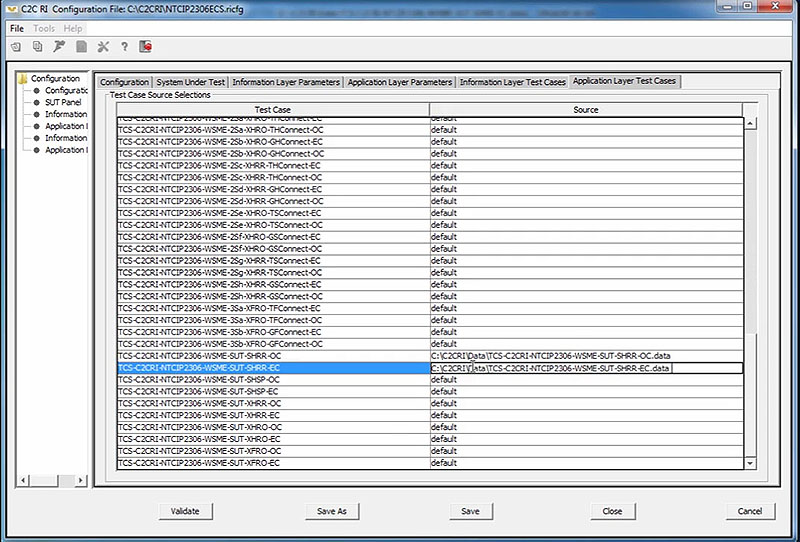
(Extended Text Description: Testing with a Data File - frame 17 of 19. Please see prior frames of this short video clip for more information. Author's relevant narration of this frame: Our test case is near the bottom of the list. We're interested in the TCS-C2CRI-NTCIP2306-WSME-SUT-SHRR-OC and EC test scripts. We'll set the source of these to the file names of our data files. Once we've customized our data-- once we've customized the settings...)
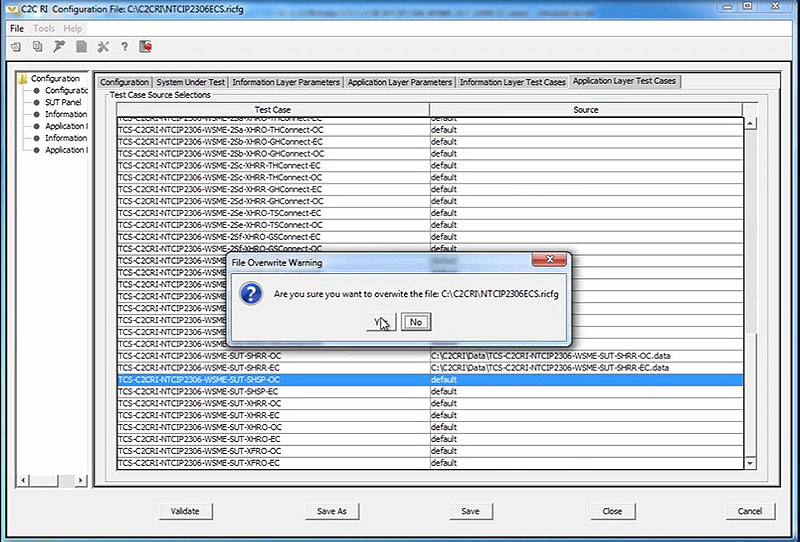
(Extended Text Description: Testing with a Data File - frame 18 of 19. Please see prior frames of this short video clip for more information. Author's relevant narration of this frame: ...we can close the file and save our data. We'll repeat this with the OC configuration file.)
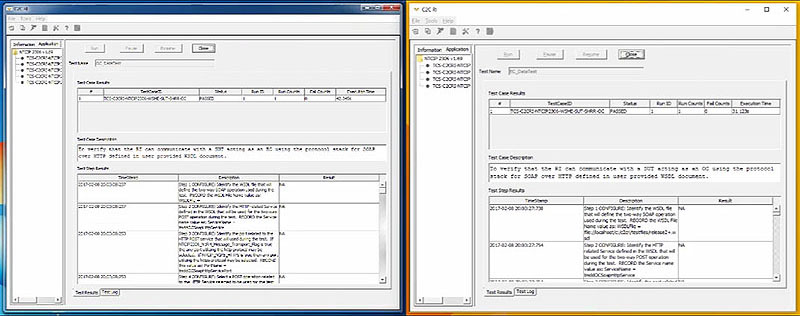
(Extended Text Description: Testing with a Data File - frame 19 of 19. Please see prior frames of this short video clip for more information. Author's relevant narration of this frame: Now we enlarge our two instances of the C2C RI again. We'll start the OC first so that it will start listening. This time, rather than prompting us for information, the tool immediately begins to perform checks and lets us know when it's ready to receive. We'll accept that notice and then begin the External Center instance. Likewise, it immediately begins its checks without any prompts. This level of automation is critical for reliably repeating tests in an efficient manner.)
Slide 38:
Request - Reply Exchange
Data Files
You still have to know what values to enter
- Requires understanding of WSDL
- Requires understanding of XML
- Entries can be made once and saved
In version 1, the XML response message must be exact for the request

In version 2, the XML response message may be a super-set
- An inventory response message may contain a list of all signs within the region. If a request is received for only part of the region, Version 2 will only transmit signs within requested area
Slide 39:
Subscription-Publication Exchange
Running a Test with Multiple Publications
- For Publications, your data file will use multiple #ITERATION tags
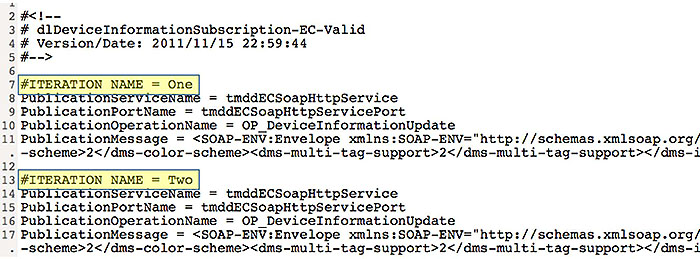
(Extended Text Description: Author's relevant description: Running a test with multiple publications: This slide displays a portion of a data file that shows an example of how the "#ITERATION" keyword can be used. The file includes a commented header followed by the text "#ITERATION NAME = One" on its own line. Underneath this "ITERATION" heading, various parameters are assigned values. After this, the file contains another line with the text "#ITERATION NAME = Two" on its own line. Underneath this heading various parameters with the same parameter names shown before are assigned new values. Key message: Explain how to define a data file for multiple publications The C2C RI also supports sending multiple publications to a single subscription message. In fact, the data file for a subscription-publication test case can be written to define different variable values for each publication. This is done by using the #ITERATION tag and setting it to different values, and then accompanying that tag with its own set of variables as shown on this slide.)
Slide 40:

Slide 41:
Question
How can you get the C2C RI to publish multiple publications for one subscription?
Answer Choices
- Enter the number of publications in the configuration file
- Use the #ITERATION keyword in the associated data file
- Multiple publications are not supported by the C2C RI
- The C2C RI can receive but not publish multiple publications
Slide 42:
Review of Answers
 a) Enter the number of publications in the configuration file
Incorrect. The configuration file does not have a parameter like this.
 b) Use the #ITERATION keyword in the associated data file
Correct! The user uses the #ITERATION keyword in the *.data file.
 c) Multiple publications are not supported by the C2C RI
Incorrect. The C2C RI does support multiple publications with the #ITERATION keyword.
 d) The C2C RI can only receive multiple publications
Incorrect. The C2C RI is able to both send and receive multiple publications.
Slide 43:
Learning Objectives
- Install and configure the C2C RI on a PC
- Operate the C2C RI
- Retrieve the C2C RI results from a test
Slide 44:
Learning Objective 3
- Retrieve the C2C RI results from a test
Slide 45:
Viewing Results
Real-Time Results
The C2C RI shows the results on-screen
Screen space is limited
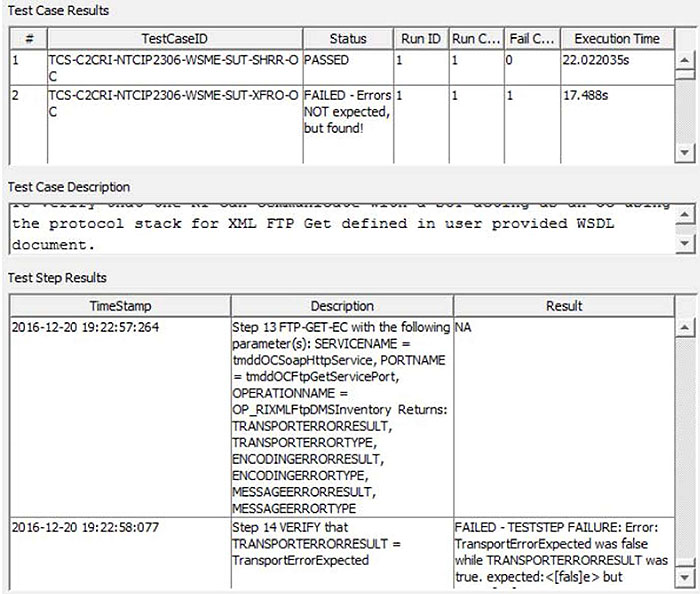
(Extended Text Description: Author's relevant description: Real-time results: The right side of this slide shows a screen shot of the C2C RI software zoomed in on its display of test case results, test case description, and test step results. The test case results only show two rows, the test case description shows two lines, and the test step results shows one and a half rows. Key message: C2C RI provides real-time results. The C2C RI presents results in real-time on the screen. The upper pane provides a summary for each test performed and the lower pane shows the step-by-step details of the selected test. When a step fails, the result cell provides a description of the failure. This allows the user to diagnose the problem without having to go through the entire process of generating a report. However, screen space is limited and the report format (which we'll discuss later) may offer an easier to read format.)
Slide 46:
Viewing Results
Understanding Results
A reported failure may be due to:
- System Under Test (SUT) implementation error
- SUT configuration error
- Network configuration error
- User error
- C2C RI configuration error
- C2C RI implementation error
- Ambiguity in the standard
Each reported failure has to be investigated to determine cause
Slide 47:
Viewing Results
Understand Results
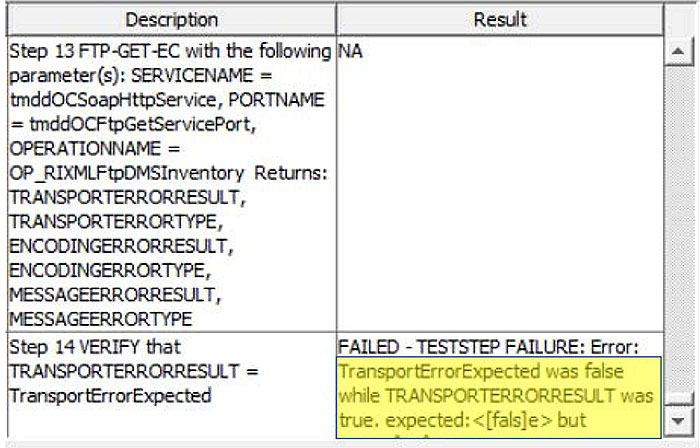
(Extended Text Description: Author's relevant description: Understand results: This slide shows a portion of the Test Step Results table that is displayed within the C2C RI when in testing mode. The screen shows the results of a sample test with a portion of the "Result" column highlighted that states: "TransportErrorExpected was false while TRANSPORTERRORRESULT was true. Expected: <false> but" and the sentence continues off-screen. Key message: Provide an example of a test that showed an error. As an example, let's investigate the error reported on the previous sample screen. This says that the test failed due to a transport error result; in other words, an error occurred related to the transport layer, or in our case, the TCP connection. Now let's consider what the likely sources of this error might be.)
Slide 48:
Viewing Results
Understand Results: Transport Error
1. SUT implementation error
- Unlikely, as this tends to be off-the-shelf software
2. SUT configuration error
- We could be receiving on a different port
3. Improper network configuration
- Perhaps the messages are not being routed
4. User error
- Probably would not result in a transport error
5. C2C RI configuration error
- Perhaps we are sending to the wrong IP address
6. C2C RI implementation error
- Unlikely, as this tends to be off-the-shelf software
7. Ambiguity in standard
- Unlikely, as Transport Layer standards are well proven

Slide 49:
Viewing Results
Understand Results: Transport Error
How do we isolate the error?
-
Follow the logical flow of information
- Did EC send request?
-
Did request appear on the wire?
- Near the EC?
- Near the OC?
- Did OC receive the request?
- Did OC log an error or send a response?
- Did the response appear on the wire?
- Did the EC receive the response?
- Did the EC log an error?

Slide 50:
Viewing Results
Capturing Results for Archives
Issues should be documented in anomaly reports
Once anomaly is identified, fix issue and repeat test
Correction may identify or even create new issues
A complete regression test should be performed at end
Slide 51:
Viewing Results
Capturing Results for Archives
Results are captured to the log file during test
File is automatically saved and signed when closing test
File location can be specified when:
- Defining directory structure under options
- Starting test
- After test by moving file to desired location
Slide 52:

Slide 53:
Question
Which of the following might cause the C2C RI to report a failure?
Answer Choices
- Ambiguity in standard
- SUT configuration error
- C2C RI configuration error
- All of the above
Slide 54:
Review of Answers
 a) Ambiguity in standard
Incorrect. An ambiguity in the standard can cause a failure, but so can the other options.
 b) SUT configuration error
Incorrect. An error in the SUT configuration can cause a failure, but so can the other options.
 c) C2C RI configuration error
Incorrect. An error in the SUT configuration can cause a failure, but so can the other options.
 d) All of the above
Correct! All three options can cause the C2C RI to report a failure.
Slide 55:
Learning Objectives
- Install and configure the C2C RI on a PC
- Operate the C2C RI
- Retrieve the C2C RI results from a test
- Prepare a report based on the C2C RI results
Slide 56:
Learning Objective 4
- Prepare a report based on the C2C RI results
Slide 57:
Preparing Reports
Preparing Reports

(Extended Text Description: Preparing Reports - frame 1 of 8. Please note, this slide contains a short video clip. The author's relevant key message and transcript of the video clip, along with key still frames of the video clip are presented below.
Author's relevant narration of this frame: The C2C RI offers the user the ability to produce a variety of different reports.
Key message/narrative of overall video clip: Explain how to produce the PDF reports offered by the C2C RI. The C2C RI offers the user the ability to produce a variety of different reports. Any of these reports can be generated by selecting the Reports option under the File menu. In the dialog box, select whether you would like to generate a configuration or log report by selecting the appropriate tab. Once on the tab, you can enter the desired report filename and select the configuration or log file you want to generate the report from. Finally, select the type of report you would like to generate and press the "Create PDF" button. The C2C RI will then generate a PDF file as directed. Once the report generation is complete, you can go to the directory structure and open the PDF file with any PDF reader.)

(Extended Text Description: Preparing Reports - frame 2 of 8. Please see prior frames of this short video clip for more information. Author's relevant narration of this frame: Any of these reports can be generated by selecting the Reports option under the File menu.)
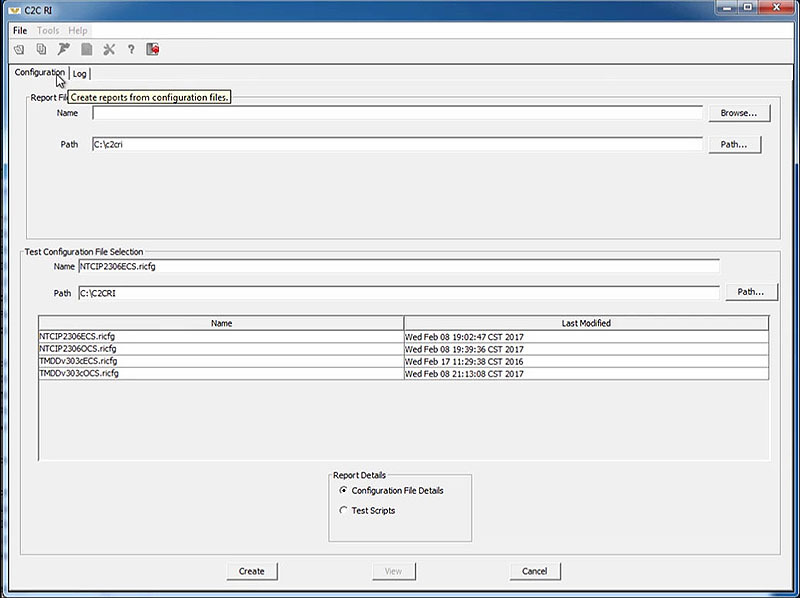
(Extended Text Description: Preparing Reports - frame 3 of 8. Please see prior frames of this short video clip for more information. Author's relevant narration of this frame: Once the dialog box opens, select whether you'd like to generate a Configuration report or a Log report by selecting the appropriate tab.)
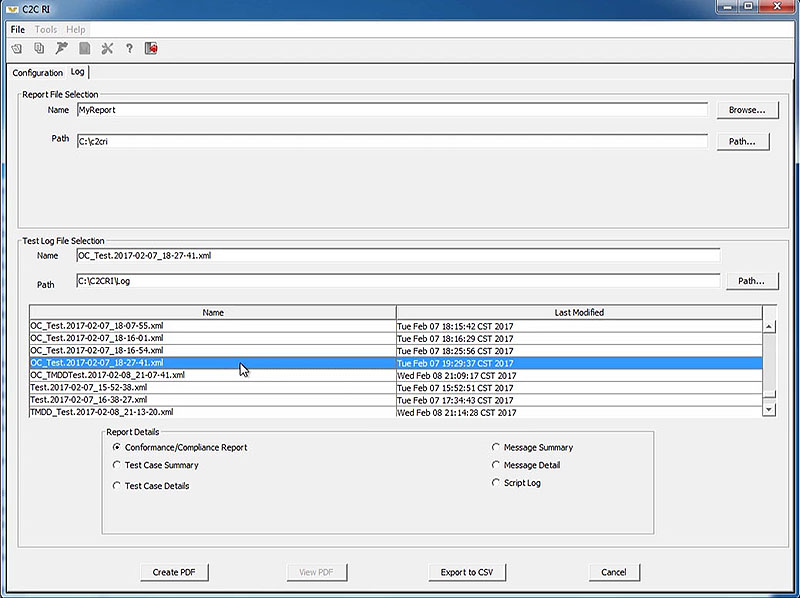
(Extended Text Description: Preparing Reports - frame 4 of 8. Please see prior frames of this short video clip for more information. Author's relevant narration of this frame: Once on the tab, you can enter the desired report file name and select the configuration or log file you want to generate the report from.)
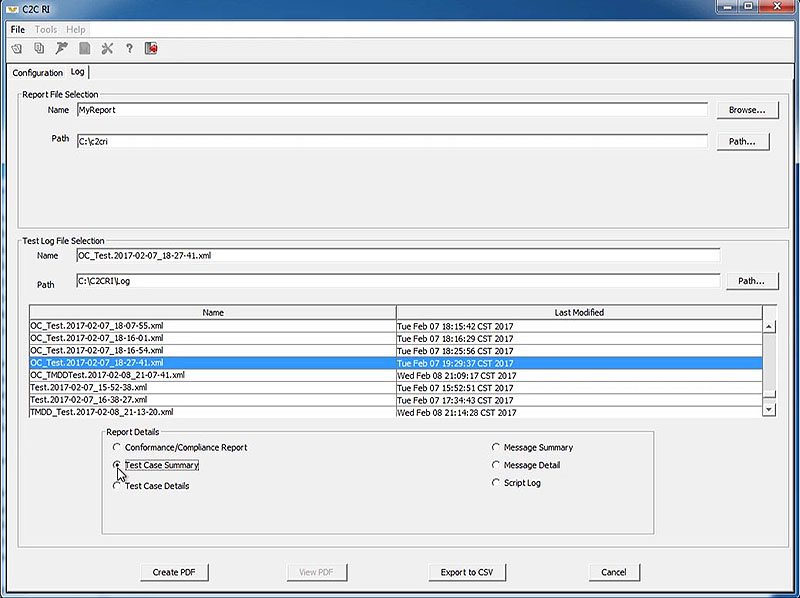
(Extended Text Description: Preparing Reports - frame 5 of 8. Please see prior frames of this short video clip for more information. Author's relevant narration of this frame: Finally, select the type of report you would like to generate and press the Create PDF button.)

(Extended Text Description: Preparing Reports - frame 6 of 8. Please see prior frames of this short video clip for more information. Author's relevant narration of this frame: The C2C RI will then generate a PDF file as directed.)
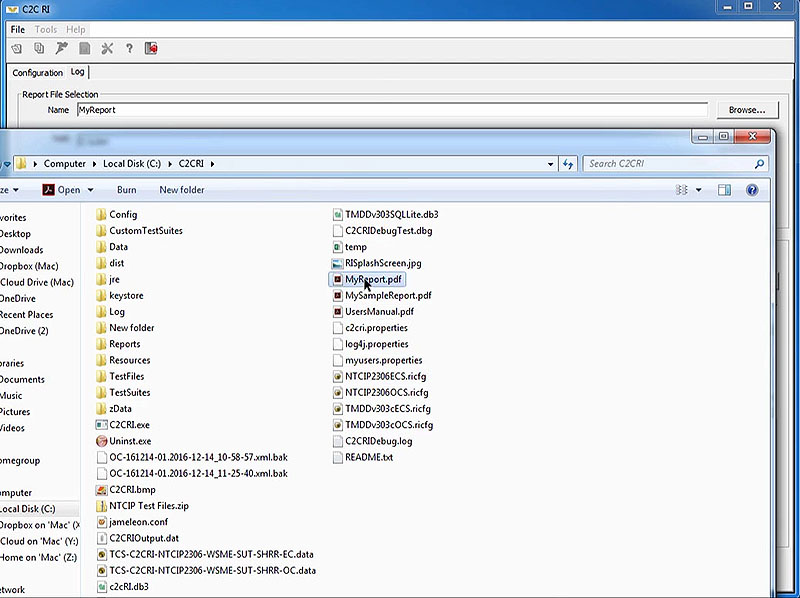
(Extended Text Description: Preparing Reports - frame 7 of 8. Please see prior frames of this short video clip for more information. Author's relevant narration of this frame: Once the report generation is complete, you can go to the directory structure...)
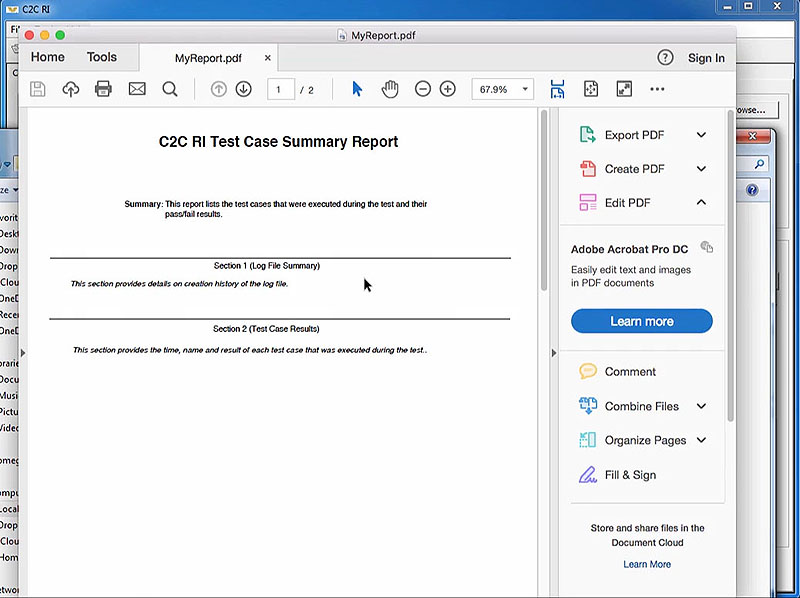
(Extended Text Description: Preparing Reports - frame 8 of 8. Please see prior frames of this short video clip for more information. Author's relevant narration of this frame: ...and open the PDF file with any PDF reader.)
Slide 58:
Preparing Reports
IEEE 829-2008 Report Formats
| IEEE 829 Report | C2C RI Report |
| Test Log | Test Case Details |
| Message Summary | |
| Message Details | |
| Script Log | |
| Configuration File Details | |
| Anomaly Report | <Same as above> |
| Test Report | Conformance Compliance Report |
| Test Case Summary | |
| Section 1201 Conformance (Version 2 only) |
Slide 59:
Preparing Reports
Test Log
- Chronological record of relevant details
-
C2C RI provides four types of log reports
- Test Case Details: step-by-step log
- Message Summary: identifies each message sent/received with timestamp
- Message Detail: complete contents of each message sent/received
- Script Log: logs the start/end of each called script
- May include other non-C2C RI logs
Slide 60:
Preparing Reports
Anomaly Report
-
Any event that occurs during the testing process that requires investigation
-
Anomaly report documents
- The problem
- The impact
- The corrective action needed
-
Anomaly report documents
- All C2C RI test reports can assist in producing an anomaly report
Slide 61:
Preparing Reports
Test Report
Summarize results and provide evaluation and recommendations
-
Test Case Summary:
- pass/fail for each test in chronological order
-
Conformance Compliance Report:
- pass/fail for each requirement (reverse traceability)

-
Section 1201 Conformance:
- pass/fail for each Section 1201 requirement
Slide 62:

Slide 63:
Question
Which C2C RI report will assist in developing an anomaly report?
Answer Choices
- Test Case Details
- Message Summary
- Message Details
- All of the above
Slide 64:
Review of Answers
 a) Test Case Details
Incorrect. The Test Case Details report will help identify the step where the error occurs, but other reports assist as well.
 b) Message Summary
Incorrect. The Message Summary report will help identify if messages were sent/received, but other reports assist as well.
 c) Message Details
Incorrect. The Message Details report will help identify if a message contained an error, but other reports assist as well.
 d) All of the above
Correct! All of these reports assist in developing an Anomaly Report.
Slide 65:
Module Summary
- Install and configure the C2C RI on a PC
- Operate the C2C RI
- Retrieve the C2C RI results from a test
- Prepare a report based on the C2C RI results
Slide 66:
TMDD Testing Curriculum
 Module A321a:
Understanding User Needs for Traffic Management Systems Based on TMDD Standard.
 Module A321b:
Specifying Requirements for Traffic Management Systems Based on TMDD Standard.
 Module T321:
Applying Your Test Plan to the TMDD Standard.
 Module T251:
Center-to-Center (C2C) Reference Implementation (RI) - Introduction.
 Module T351:
Center-to-Center (C2C) Reference Implementation (RI): Applying the C2C Reference Implementation.
Slide 67:
Thank you for completing this module.
Feedback
Please use the Feedback link below to provide us with your thoughts and comments about the value of the training.
Thank you!